Quantcast
Channel: SOA and Middleware – AMIS Oracle and Java Blog
Viewing all 102 articles
Browse latest View live

SOA Suite 12c: Property window for inspecting and editing BPEL activities

$
0
0

Before release 12c, editing activities in a BPEL process was done in the wizard that could be activated by double clicking the activity or by selecting edit from the context menu on an activity. Alternatively, a developer could resort to the BPEL process source file to make changes to the definition of activities.

In 12c, the property inspector has been extended to also support editing the properties of BPEL activities. When the property inspector window is available, it will synchronize with the currently selected activity in the BPEL editor.

The property inspector is opened using the top menu action: Windows | Properties.

image

When we select a BPEL activity in the BPEL editor, the inspector recognizes the activity and adjusts its appearance to the properties defined for the activity:

image

Note: you can drag and drop any window in JDeveloper to a new location.

When a scope is selected, the property inspector will show the details for the scope, including its variables and catch activities. When the BPEL process as a whole is selected, the property inspector recognizes that too:

image

The post SOA Suite 12c: Property window for inspecting and editing BPEL activities appeared first on AMIS Technology Blog.


SOA Suite 12c: Testing SOA composite services from JDeveloper using HTTP Analyzer

$
0
0

In JDeveloper 12c, it is very simple to test the web services (SOAP and REST) exposed by SOA composites from the comfort of your own IDE. Using a simple right mouse click on the composite’s service interface (in the Application Server overview window), we can start the HTTP Analyzer for the service – with the right endpoint set, the WSDL (or WADL) loaded and the request message entry form ready to be filled in.

For example the following SOA composite application:

image

after we deploy it, it exposes a single service with a single operation process. Assume deployment to the Integrated WebLogic Server. Bring up the Application Servers window (Windows | Application Servers):
image

And browse for the deployed composite – under the application server connection for Integrated WebLogicServer | SOA | DefaultServer | <name of partition>. Expand the node for the composite. Right click on the service to be tested. From the context menu, select Test Web Service:

image

The HTTP Analyzer will open, with all relevant details set:

image

All we have to do is provide the request message – either in the form or in the XML view

image

In this way, testing a service right after deployment becomes much easier and does not require us to switch to Soap UI or Enterprise Manager FMW Control.

What we cannot [yet]do in SOA composites – unlike Service Bus – is simply right click a component and select Run or Debug from the context menu…

The post SOA Suite 12c: Testing SOA composite services from JDeveloper using HTTP Analyzer appeared first on AMIS Technology Blog.

SOA Suite 12c: Exploring Dependencies – Visualizing dependencies between SOA artifacts

$
0
0

SOA composites as well as Service Bus projects typically consist of fair number of artifacts that hang together in ways that are sometimes not so easy to track down. Through import statements, hard coded references and other direct or indirect definitions, dependencies are registered between the many files that make up the application. From BPEL component to WSDL to XSD to other XSD is a not too uncommon path. However, for developers it can be quite a challenge to get a good grasp on these dependency paths. Inspired by – and perhaps more than just inspired – the App XRay feature in OEPE (Eclipse), JDeveloper 12c ships with the Dependency Explorer. This is a tool that can be set upon almost any artifact in SOA composites or Service Bus projects. It will leverage all its built in knowledge about potential dependencies and it will visualize these dependencies.

For example, let’s look at this simple Service Bus project. Right click on the pipeline definition in the navigator window and select the option Explore Dependencies:

image

The dependencies for this simple case are shown like this:

image

In the Dependency Explorer itself, we can right click all components listed and drill further down, list the reference details, select the component in the navigator or bring up the editor for the component.

Here is the drilled down overview of dependencies, starting from the WSDL document ProxyService.wsdl and backtracking what are the references to the WSDL document.

image

In a previous article, we introduced the SOA Suite 12c support for XQuery library modules.

We can open the dependency explorer for an XQuery library

image

and learn where it is used:

image

This overview tells us that we will indirectly impact the ProxyService if we do something wrong with the TimeAndDateLibrary.xqy.

An even more impressive overview is produced by exploring the dependencies for a BPEL component, as is shown here:

image

This results – in this particular example – in:

image

One final example shows how a Database Adapter was analyzed – both the usage from the SB Business Service and the reference to the WSDL and indirectly the XSD:

image

Resources

Quite unrelated: domains_sample

The post SOA Suite 12c: Exploring Dependencies – Visualizing dependencies between SOA artifacts appeared first on AMIS Technology Blog.

SOA Suite 12c: Getting started in 30 minutes

$
0
0

This blog will get you started with the Oracle SOA Suite 12C. We will install the SOA Suite, create a Hello World BPEL project, deploy it on the integrated weblogic server and test it with the http analyzer.

The first step is downloading the SOA Suite from OTN. Enter your Oracle Technology Network account, if you don’t have one you’ll need to create an account. Download the zip file to a temporary folder, in my case C:/TEMP.

image

While the file is being downloaded it is time to check upon your Java Development Kit version, a fairly recent JDK is needed before you can actually install the SOA Suite (for example I’m using 1.7.0_15). Check if you meet this prerequisite, if not install one. After this check if you have JAVA_HOME environment variable pointing to the JDK, if not create one.

image

When the SOA Suite has finished downloading unzip it. Open a command prompt as an administrator.

image

In the command prompt navigate to your temporary folder where you unzipped the download. Run the following command: %JAVA_HOME%\bin\java -jar fmw_12.1.3.0.0_soa_quickstart.jar

Follow the installation wizard. During the installation you’ll need to enter a Oracle Home, this is the location where JDeveloper will be installed. In the end of the wizard click install. The installation will take a while. After the installation is finished click on finish. JDeveloper will be started automatically.

image

The next step is configuring and starting the integrated weblogic server, this prevents having to wait for it later. After JDeveloper has started click on Window and then Application Servers. This will open the application servers view.

image

The first time you start the integrated server you need to create a domain, by right clicking on the IntegratedWebLogicServer and then Create Default Domain.

image

Enter a password for the weblogic user in the prompt, accept all other defaults.

image

Creating this domain will take a while. So for now let’s start creating the first process. Go back to Applications and click on New Application…

clip_image002

We want to create a SOA Applicaton. In the creation wizard enter a name for the application and project. Accept the defaults Standard Composite and Empty Composite, but do note the interesting Template and Subprocess options. The result should be something like the screenshot on the right.

clip_image002[4]clip_image004

Create a bpel process by dragging it from the components view on the right to the middle of the composite in the components column. Enter a name for the process and for the template select the Synchronous BPEL Process. Accept all the defaults, yes finally a default bpel 2.0 process.

clip_image006

After finishing this wizard you should see something like the below image.

image

Double click on the BPEL process so you can start editing it. Drag an assign, from the components view on the right, between the receiveInput and replyOutput.

imageimage

Double click on the assign. Select and drag the input (inputVariable) to the result (outputVariable).

image

Start editing the from expression, by right clicking on the from expression and choosing the Edit ‘from’ expression.

image

If you’ve accepted the defaults so far, it would be enough to replace the expression with something like this: concat(“Hello “, $inputVariable.payload/client:input)

image

Click on OK on both prompts. Now we are going to deploy the HelloWorld service to the integrated server. Right click on the project (in my case HelloWorld). Hover over Deploy and click on HelloWorld… During the deployment make sure Deploy to Application Server is selected and click on next. In the next screen check the box for Overwrite any existing composites with the same revision ID. This is not needed at the moment, but if you want to redeploy this project you can use the same deployment profile.

image

In the next screen make sure the IntegratedWebLogicServer is selected.

image

Click next and accept all the defaults on the next screen by clicking finish. After the deployment has finished go the Application Servers window. Go to HelloWorld process by following the path IntegratedWebLogicServer >> SOA >> DefaultServer >> default >>HelloWorld [Default 1.0]. Right click on helloworld_client_ep and on the prompt click on Test Web Service.

image

The http analyzer starts. Enter your name in the input and click on Send Request.

image

This concludes this blog about getting started with the SOA Suite 12c. Finding out what actually happened on the SOA Suite server when you ran the above test will be part of another blog named SOA Enterprise Manager which will follow shortly.

The post SOA Suite 12c: Getting started in 30 minutes appeared first on AMIS Technology Blog.

SOA Suite 12c: Weekend Roundup

$
0
0

Almost 100 hours ago Oracle SOA Suite 12c was released and 72 hours ago BPM Suite 12c had it turn. At AMIS we held a 50+ hours blog-a-thon and published a total of 25 blogs. This blogs looks back at the release of SOA Suite and BPM Suite 12c.

On Thursday 26th of June at 09:00 AM PST (06:00 PM CET) Oracle release SOA Suite 12c. Right after the release we published the first blog with the most striking features. Together with us a lot of people followed what happened next on twitter, the 12c madness exploded. Right after the released the first people downloaded the software and posted the first pictures and experiences with the installation of the SOA Suite quick start. The whole night I followed the tweets from the SOA community and the product managers of Oracle that made it all happen.

Below a selection of related posts we published in the last few days

First look at SCA Composite features This blog will summaries the features specific to SCA Composites / BPEL and the Enterprise Manager Dashboards. The features are summarised, but most will get an own blog that tells about the full details. The following features are discussed; Changed project / directory structure, Project / Component en Scope Templates, updates to the composite editor, updates to the mediator, updates to the BPEL component / activities, the Fault Policy Editor,SOA Composer refresh in 12c and the SOA Suite Debugger. Read more.

All about Developer Productivity and Performance  This blog will summaries the features specific to the Developer Productivity and Integration in JDeveloper and in the Enterprise Manager. The features are summarised, but most will get an own blog that tells about the full details. The following features are discussed; Developer installer, Integration of SOA and SB development, New technology adapters, New Database Connection Types and Performance & Optimization. Read more.

First look at Service Bus features This blog will summaries the features specific to Service Bus and the Enterprise Manager Dashboards. The features are summarised, but most will get an own blog that tells about the full details. Oracle renamed the product from OSB (Oracle Service Bus) to SB (Service Bus), apparently it also stands for Oracle Secure Backup. The following features are discussed; Integrated with JDeveloper, Splitting Proxy from Pipeline, Kick-start an Service Bus (SB) project using templates, MDS support for importing shared resources and possibility to enable/disable activities. Read more.

The Star of the SOA Suite 12c – The Pipeline Every new product release has a star. And of course picking that star is arbitrary. One person’s favorite feature may not be someone else’s. My pick of the 12c crop is … (drum roll) …. the Pipeline! The Pipeline is new – to some extent. In Service Bus 12c, instead of a Proxy Service that contains a Message Flow as we used to have in previous incarnations of OSB and Aqualogic Service Bus, we now have two separate components: the Proxy Service and the Pipeline (which contains the Message Flow). Read more.  

Introducing the REST Adapter. Calling a RESTful service returning JSON The REST Adapter is an important new feature of Oracle SOA Suite 12c. This new adapter allows easy calling/exposing of RESTful services (see http://technology.amis.nl/2014/05/14/what-is-rest/ for an introduction to REST) based on a WADL or configured manually. Not only does Oracle introduce the REST Adapter, but JSON support is also added in SOA Suite 12c. These features will greatly increase the integration options and flexibility of Oracle SOA Suite. In this blog I’ll describe how a RESTful service can be called by using the REST adapter. Read more.

BPEL Inline Sub Processes or locally Reusable Chunks of BPEL process logic An in-line sub process can best be thought of as a callable scope. It is a scope that is not part of the normal process flow, but rather a unit of encapsulated logic that can be called zero, one or multiple times from anywhere within the BPEL process – even recursively from within itself. It is in effect very similar to a private member function in a Java Class or a procedure in the body of a PL/SQL package. Read more.

Sharing resources between development environments: Export from and Import to Design Time SOA MDS repository  The MDS repository is an important mechanism for SOA Suite 12c, both at design time during development as well as at run time. At design time, MDS is used to host shared resources such as WSDL and XSD documents that are referenced in many different places. Instead of copying these resources between applications and projects,  MDS is concept that is native to JDeveloper and therefore much easier to use with these shared resources. Read more.

Dynamically overriding attributes of static routing rules in Mediator component Routing Rules in a Mediator component carry several attributes that govern the routing rule run time behavior. These include: XSLT or XQuery used for transformation, the filter expression, target operation, the parallel or sequential indicator, the Schematron document used for validation, the native validation and the value assignment (for example for header properties). Read more.  

Where to find Service Bus Pipeline Alerts In SOA Suite 12c, the Service Bus console no longer exists. The Service Bus specific run time browser interface is not intended for administration activities: all administration around SOA Suite 12c is consolidated into Enterprise Manager Fusion Middleware Control. So a valid question now becomes: how to locate pipeline alerts produced in 12c Service Bus run time environments? These are of course to be found in EM FMW Control. But where and how exactly? Read more.

Native Format Translation in Service Bus Pipeline – XML to and from JSON, CSV and fixed position formats Data offered as internet resource in a structured XML or non-XML format (such as JSON, CSV or fixed position) – cannot be retrieved by the File Adapter, but it can be read by the Service Bus. Using a combination of an HTTP transport style Business Service, a Service Callout and a Native XSD mapping, it turns out to be fairly easy to implement what is best described as a remote file adapter. Read more.

Using Domain Value Map (DVM) in Service Bus projects Domain Value Maps are still DVMs in SOA Suite 12c. Create them in JDeveloper, use them in Transformations and Assignments in Mediator and BPEL. Inspect them and edit them at run time using SOA Composer. Nothing really new there. Read more.

BPM Suite 12c: Oracle Business Rules – Verbal Rules In this blog post I will transform a Decision Table step-by-step into the new Verbal Rules. As a starting point I created a composite with a BPM, a BPEL and a Rules component. Both BPM and BPEL components use the same Rules component. See the following three screenshots. You can download the sample application with this starting point from here. Read more.

Neat little feature in Service Bus Pipelines: Disable/Enable Activity to ease development Sometimes it is just a small feature that can make life easier. SOA Suite 12c is full of large, sweeping new components and grant improvements. And it also has a ton of smaller things. One such smaller new thing is the ability in Pipelines in Service Bus projects to disable an activity. Sounds perhaps like something you would typically not want to do – add an activity then disable it. Read more.

Support for reusable XQuery Libraries | Modules It featured in many forum discussions (such as this one) in the last few years: “The Oracle Service Bus XQuery engine fully supports all of the language features that are described in the World Wide Web (W3C) specification for XQuery with one exception: modules”. See for example the W3C spec. Library Modules would make it possible to create reusable XQuery functions, that are available for use in any XQuery transformation. Read more.

First steps with the Coherence Adapter to create cross instance state memory One of the new adapters shipped with SOA Suite 12c is the Coherence Adapter. This JCA adapter makes it easy for a Service Bus business service or a SOA composite application to interact with a Coherence memory grid. Fully declaratively and with very little trouble, data can be put on a Coherence grid (aka cache) and read from that cache. The cache is accessed like a big map: using a key, an object is saved to and retrieved from the cache. The cache is accessible across service executions and process instances, as well as across cluster nodes. Read more.

Property window for inspecting and editing BPEL activities Before release 12c, editing activities in a BPEL process was done in the wizard that could be activated by double clicking the activity or by selecting edit from the context menu on an activity. Alternatively, a developer could resort to the BPEL process source file to make changes to the definition of activities. In 12c, the property inspector has been extended to also support editing the properties of BPEL activities. When the property inspector window is available, it will synchronize with the currently selected activity in the BPEL editor. Read more.

BPM Suite 12c: Quick Start installation – 20 minutes and good to go Oracle released BPM Suite 12c. Just like SOA Suite 12c – released the day before – this release comes with the quick start option: to quickly start going through development and test iterations, the development environment (JDeveloper + BPM Studio) is now equipped with an Integrated WLS that contains the BPM Suite 12c run time engine. All one needs to not only develop but also to run a BPM process is packaged in a single environment that is installed from a single file. Read more.

For full list check our SOA Suite 12c overview.

Mentionable Blogs from the community

SOA Suite 12c is available for download SOA Suite 12c is a major step forward to become an “Industrial SOA” and developer productive solution. Key new features include: Performance & Optimization (Modularity, Composite Lazy Loading, WLS Work Manager Based Tuning) and Diagnosability & Manageability (Task Based Enterprise Manager, Enterprise Scheduler Service).  Read More.

Using the clone ability to duplicate a Service Bus 12c project (by Jan van Zoggel) It’s quite common in a service oriented landscape that a newer version of a service is required. For instance due to new functionality for 1 service consumer which brakes the contract for the other consumers. JDeveloper 12c has a cool feature helping us to clone a Service Bus project. Read More.

Getting started with Oracle Service Bus 12c: importing 11g sources (by Laurens van der Starre) One of the new features is that Oracle Service Bus development is integrated into Oracle jDeveloper Studio. One way to get started quickly is by simply importing your 11g service bus sources into 12c. First export your 11g sources, either from the Servicebus Console or Eclipse (OEPE)… Then, this sbconfig.jar is easily imported into the new Oracle jDeveloper Studio 12c (as expected). Read more.

Also twitter exploded, below are my favorite tweets

The post SOA Suite 12c: Weekend Roundup appeared first on AMIS Technology Blog.

SOA Suite 12c: Obtaining composite resources; WSDLs, XSDs and WADLs

$
0
0

In SOA Suite 12c and 11g there are several options to obtain composite resources such as WSDL’s and WADL’s. In this blog post I will demonstrate some of them and provide some background information. First I’ll describe how URL’s can be used to access composite resources. Next I’ll describe how and when the EM test console and the Webservice test client can be used to gain information about composite WSDL’s and XSD’s.

Understanding URL’s

In order to request WSDL’s and WADL’s (which contain information on how a service can be called), understanding how URL’s are build up in Oracle SOA Suite helps.

REST services

A nice new feature in Oracle SOA Suite 12c is the support for WADL’s. In order to obtain information about which (composite) resources are available at which URL, the SOA Infra application provides a WADL. On the integrated Weblogic server domain, this WADL can be accessed at: http://localhost:7101/soa-infra/resources/application.wadl

The SOA Infra application has a WADL to describe how services can be accessed.

The SOA Infra application has a WADL to describe how services can be accessed.

This WADL provides information on the different ways resources can be requested. For example, I have deployed an HelloWorldREST composite with a HelloWorldRestService service.

A simple SOAP service can be called using a different URL scheme.

A simple REST HelloWorld service

I am able to determine the service endpoint:

http://localhost:7101/soa-infra/resources/default/HelloWorldREST/HelloWorldRestService

And since it is a RESTful service, I can request the WADL which provides information on possible service endpoints and how to call them at

http://localhost:7101/soa-infra/resources/default/HelloWorldREST/HelloWorldRestService/application.wadl

What is considered a service however, is a RESTful service, so this will not help you with SOAP webservices like the one below.

Simple SOAP service follows a different URL scheme

Simple SOAP service follows a different URL scheme

The following URL is not accessible:

Since a SOAP service follows a different URL scheme, the following doesn't work.

Since a SOAP service follows a different URL scheme, the following doesn’t work.

SOAP services

SOAP services follow a similar scheme to allow accessing services. The URL slightly differs though.

http://[host]:[port]/soa-infra/services/[domainname]/[composite name]/[servicename]

This allows accessing the default revision of an endpoint of a service. If you want to call a specific revision, the below URL allows specifying the revision.

http://[host]:[port]/soa-infra/services/[domainname]/[composite name]![revision]/[servicename]

It is also possible to target a specific deployment of a composite. This can be dangerous because this changes upon redeployment.

http://[host]:[port]/soa-infra/services/[domainname]/[composite name]![revision]*[label]/[servicename]

The last URL has an identifier called ‘label’. Labels are used in the MDS (http://docs.oracle.com/cd/E25178_01/core.1111/e10105/repos.htm#CIHCAJHA). Composites are deployed to the MDS and get an automatically generated label upon deployment. This changes after every deployment of a composite with the same name/partition/revision. I have not tried manipulating labels of deployed composites and the effects that might have.

WSDL’s

WSDL’s can be obtained by using the servicename and append ?WSDL to it. For example to access my HelloWorld service WSDL, the following URL can be used:

http://localhost:7101/soa-infra/services/default/HelloWorld/helloworldbpel_client_ep?WSDL

If you open the endpoint(/service URL) in a browser, you get forwarded to the Webservice Test Client (on development servers):

http://localhost:7101/soa-infra/services/default/HelloWorld/helloworldbpel_client_ep

Test console and test client

Not only by means of constructing the URL manually, can resource URL’s be determined. There are also several supporting tools available such as the test console in the Enterprise Manager and the Webservice Test Client. The Webservice Test Client is only installed on development servers. The Enterprise Manager Test console can be used if you have access to the Enterprise Manager. The Monitor role is enough to be able to use the EM test console.

Obtain the concrete default WSDL from the test console

A concrete WSDL can be determined by opening the EM test console

A concrete WSDL can be determined by opening the EM test console

The WSDL can be obtained from the test console in the Enterprise Manager. This is a concrete WSDL generated upon deployment of a SOA Suite composite. It contains references to the default revision of the composite and also a reference in the documentation tag to the abstract WSDL;

The abstract WSDL can be obtained from the documentation annotation in the concrete WSDL.

The abstract WSDL can be obtained from the documentation annotation in the concrete WSDL.

If the WSDL URL in the EM test console contains an MDS label and you don’t expect it, something is probably wrong and you should try an undeploy and redeploy under different revision and/or a server restart.

Obtain the abstract default WSDL from the composite

As suggested in the previous screenshot of the WSDL, the abstract WSDL can be obtained directly from the composite:

The abstract WSDL can be obtained directly from the composite.

The abstract WSDL can be obtained directly from the composite.

This trick can also be used to obtain XSD’s from inside a composite, by for example going to an URL like (on my development environment); http://localhost:7101/soa-infra/services/default/HelloWorld!1.0/Schemas/HelloWorldBPEL.xsd

If the abstract WSDL is placed in the MDS, the reference to the WSDL’s and XSD’s also refer to an MDS path. This allows by means of relative URL’s to access the entire MDS (this was possible in SOA Suite 11g. I have not checked this in SOA Suite 12c yet). In such a case, composite resources cannot be accessed.

Webservice test client

I am mentioning the testclient because you get forwarded to it when opening a service endpoint and it allows you to obtain information about the WSDL and XSD of a service. Also you do not need specific privileges to access the webservice test client.

The Webservice Test client can be used to test SOAP services. It cannot be used for services solely described by a WADL. The Webservice Test client provides a webinterface for calling a SOAP service. In my example I can open the URL obtained from my concrete WSDL of my service in the browser: http://localhost:7101/soa-infra/services/default/HelloWorld/helloworldbpel_client_ep

The URL is translated into the folowing: http://localhost:7101/ws_utc/?wsdlUrl=http://localhost:7101/soa-infra/services/default/HelloWorld!1.0*soa_2c171323-5b85-4d1f-876e-eecda27e5bc6/helloworldbpel_client_ep?WSDL. This is a call to the ws_utc; the Webservices Test Client.


The webservice test client can be opened on development mode servers by accessing an endpoint in the browser.

The webservice test client can be opened on development mode servers by accessing an endpoint in the browser.

Webservice test client not available?

At first I tried to use the Webservice test client on my production mode server. The client however is only installed when the server is in development mode. Then I read the following: https://community.oracle.com/thread/978505?tstart=0. The post does describe a manual way to install the client on an 11g SOA Suite production mode installation. I could however not find the wlstestclient.ear in SOA Suite 12c. The following looked like it might be the test client in 12.1.3: [ORACLE_HOME]/oracle_common/modules/com.oracle.webservices.wls.ws-testclient-app-wls_12.1.3.ear. After deployment, this ear allowed ws_utc to be called. However, it gave me a HTTP 503 response. I also found the following which might have helped: http://www.thesoaman.com/2011/12/change-weblogic-server-mode-from.html. At this time I decided to try this with the integrated development Weblogic server in JDeveloper instead of patching my production server.

The post SOA Suite 12c: Obtaining composite resources; WSDLs, XSDs and WADLs appeared first on AMIS Technology Blog.

SOA Suite 12c: New visual editor for creating Fault Policies

$
0
0

In 11g Fault Policies were added so that you could easy intervene when a (SOAP/BPEL) fault was thrown. But you could only create them in source mode, there was no graphical editor. With the release of SOA Suite 12c a new visual editor for creating Fault Policies is added to JDeveloper. With the Fault Policy Editor you can now Design and Edit Fault Policies. Besides the already existed functionality a lot of new features are added.

Editor Overview

To start open/add a existing SOA project (as part of SOA application) and create a new Fault Policy document. Right-click on the SOA project and select option New -> From Gallery. From the gallery select SOA-Tier -> Faults -> Fault Policy Document to create new policy file.

12c Fault Policies Editor: Create new Policy Document

12c Fault Policies Editor: Create new Policy Document

The editor will open with a clean policy document. A policy document can have more then one policy, so faults can be grouped i.g. a policy for system faults and a policy for service faults. For every type of fault you can create a fault handler and for each handler you can select one or more actions. When adding more the one actions you can use a XPath expression to select a filter. With the editor you can also create alerts, property sets and new (custom) actions. Shortly, we will look into the details of the editor.

12c Fault Policies Editor: Start with clean Template

12c Fault Policies Editor: Start with clean Template

Lets start by creating two fault policies, one for system fault and one more service faults. You can add fault policies by clicking on the + icon and remove a fault policy by clicking on the X icon when having that policy selected. Give the Fault Policy a name that covers the containing Fault Handlers.

12c Fault Policies Editor: Add / remove Fault Policies

12c Fault Policies Editor: Add / remove Fault Policies

For every type of fault you can create a fault handler. Select for the first fault the Fault Name that you want to create the Fault Handler for. Fault are categorized in System Faults and Service Faults. Under System Fault you can select between bindingFault, mediatorFault and remoteFault and under Service Faults you can find faults defined in one of the WSDLs the composites uses. If there ain’t any this category is not shown. If you want an other Fault Handler just click on the + icon at right side.

12c Fault Policies Editor: Choose (first) fault by Name

You can select a default action (default is termination) for the list of available actions. If you have created your own action you can also select that one. Some actions may not be shown if there are not applicant to the fault type. For instance a System Fault can’t be redirected to a WS or JMS queue and a

12c Fault Policies Editor: Add action to Fault Handler

12c Fault Policies Editor: Add action to Fault Handler

You can add multiple actions to a Fault Handler and use contextual if/then/default to select the action to execute.

12c Fault Policies Editor: Add multiple actions

12c Fault Policies Editor: Add multiple actions

You can also assign an alert to an action. With this you can send an alert through email, JMS or write alert to a log file. You must first create a Alert to be able to assign one, but we will look at the creation of Alerts later.

12c Fault Policies Editor: Send Alerts on action

Alerts, Actions and Properties for custom Interactions

With the editor you can also create and edit alerts, property sets and new (custom) actions per Policy. Alerts can be used to send a message to a email address, a JMS queue or write the message to log. With property sets you can create constants that can be used to configure alerts and actions. Actions control what to do when a Fault occurs. Let’s start with explaining actions.

Actions control what to do when a Fault occurs

When creating a new Fault Policies document a set of default actions is created. These default actions show the types that are no support and can be altered to your own liking. You can also create your own actions and delete not used actions.

12c Fault Policies Editor: Actions

12c Fault Policies Editor: Actions

Type Function
Abort Terminates the entire business flow.
Human Intervention Causes the current activity to stop processing. Human intervention from Oracle Enterprise Manager Fusion Middleware Control is required to handle the fault.
Replay Scope Replay the scope the Fault occured in.
Rethrow Fault Sends the fault to the BPEL fault handlers (catch activities in scope activities).
If none are available, the fault is sent up.
Retry Provides the following options for retrying the activity:
- Retry a specified number of times.
- Provide a delay between retries (in seconds).
- Increase the interval with an exponential back off.
- Chain to a retry failure action if retry N times fails.
Java Action Enables you to execute an external Java class.
Invoke WS (new in 12c) Handles a rejected message by calling a web service (uses a Oracle defined schema).
Enqueue (new in 12c) Enqueues a rejected message to a Queue (AQ) as a JMS message with the appropriate context and payload.
File Action (new in 12c) Creates an error handler for messages by storing a rejected message in a file.


Reference Actions

The Abort, Human Intervention, Replay Scope and Rethrow Fault actions enable you to change the default reference to the action and for these actions you can only set a name. These actions were also available in SAO Suite 11g.

12c Fault Policies Editor: Default Reference Actions

12c Fault Policies Editor: Default Reference Actions

Java Action

The Java Action enables you to execute an external Java class. Just like in 11g your Java class is based on the IFaultRecoveryJavaClass interface. With this class you can do what ever you like with the rejected message. To select the Java class when editing/creating the Java action it should be in the classpath of JDeveloper.

When you define a Property Set and assign it to the Java action the property values can be accessed. For this action you can also select a default action to execute after calling the Java class or you can define Return Values to override the default action. Each value is assigned to an action that should be executed when returned by the Java class.

12c Fault Policies Editor: Java Action

12c Fault Policies Editor: Java Action

Invoke WebService (WS) Action

With this action a rejected message can be handled by calling a Web Service. If you choose to use a Web Service to handle these errors, you should implement a predefined WSDL interface implemented by the target service. The WSDL Interface for the Web Service handler must have one port type, only one input operation, and a schema for the input message.

  
  <!-- format - <Absolute wsdl path>|service name|port name -->

12c Fault Policies Editor: WS Action

12c Fault Policies Editor: WS Action

Enqueue Action

With this action you can enqueue a rejected message to a Queue as a JMS message with the appropriate context and payload, however not a JMS queue, at this moment you can only do this task with the AQ adapter. The type of the AQ should be JMS to successfully enqueue the message.

   
  <!-- QueueURI format - jdbc:oracle:thin:@<host>:<port>:<sid>#<un>/<pw>#queue -->
12c Fault Policies Editor: Enqueue Action

12c Fault Policies Editor: Enqueue Action

File Action

With this action you create an error handler for messages by storing a rejected message in a file. You can store the payload with the proper context. When creating the File Action the location needs to exist on your local machine. If your deployment environment is Linux and your development environment is Windows you need to use Linux paths i.g. c:\Temp\ = \Temp\.

  
    \Temp\
    RejectedMessage_%ID%
    <!-- FILE_NAME will support %ID%(rejected message instance id) or %TIMESTAMP% wildcards -->
  
12c Fault Policies Editor: File Action

12c Fault Policies Editor: File Action

Retry Action

This action is still the same as in 11g, but I just wanted to share the new dialog.

  
    3
    2
    
    
    <!--exponentialBackoff/-->
  
12c Fault Editor: Retry Action

12c Fault Editor: Retry Action

Property Sets

Property Sets can be used for custom Java Actions, to pass through properties that can be used in the Java code, but also with Alerts i.g. logging extra properties/constants (LOG alert). You can add

  
    localhost
    110
    emailuser
    welkom2014
  
  
    true
  
12c Fault Policies Editor: Property Sets

12c Fault Policies Editor: Property Sets

Alerts

A new addition in 12c are the Alerts. There are three types of Alerts; Log, Email and JMS. Alerts can be attached to Fault Handler actions and are executed when the action is triggered.

12c Fault Policies Editor: Alerts

12c Fault Policies Editor: Alerts

  
    $fault.code/code = "HTTP/404"


  ...
12c Fault Policies Editor: Action Alerts

12c Fault Policies Editor: Action Alerts

Log Alert

With this alert you can write a alert to the managed server log when a fault occurs. You can choose which Logger class to use, by default the java.util.logging.Logger is used, if a Property Set should be logged and you can add Supplementary attributes that a logged when a fault occurs.

  
    java.util.logging.Logger
    
      FormDispatchService
    
  
12c Fault Policies Editor: Log Alert

12c Fault Policies Editor: Log Alert

Email Alert

This alert enables you to specify the users to receive an email alert when a fault occurs. A Property Set can also be added to the email when a fault occurs.

  
    alert@amis.nl
    
  
12c Fault Policies Editor: Email Alert

12c Fault Policies Editor: Email Alert

JMS Alert

This action enables you to use JMS queues for sending alerts when a fault occurs. A Property Set is needed to connect to the correct JMS Queue. To configure the right JMS properties you can use the “Create Required Properties” wizard. You can also add optional JMS Headers.


      FaultAlert


...

  jms/testfwk/TestFwkQueue
  eis/wls/Queue
12c Fault Policies Editor: JMS Alert

12c Fault Policies Editor: JMS Alert

Add Fault Policies to Fault Bindings

Now that the Fault Policies are created they can be coupled to Fault Bindings. A policy can be coupled to a Composite, Components, Reference and Service Binding. To create/edit the Fault Bindings click on the “Edit Composite Fault Policies” icon.

12c Fault Policies Editor: Fault Bindings

12c Fault Policies Editor: Fault Bindings

The Composite Fault Policies opens. In this dialog window you can choose the Fault Policies document to use (if one is located in SOA project then this one is automatically selected). With the selected Fault Policies document you can assign the Policies of this document to the Composite, the Components and Service & Reference bindings.

12c Fault Policies Editor: Assign Policies

12c Fault Policies Editor: Assign Policies

This concludes this post. In an upcoming post I will actually go through a working end-to-end demo of the new Actions and Alerts.

The post SOA Suite 12c: New visual editor for creating Fault Policies appeared first on AMIS Technology Blog.

Resolving deployment issues with Service Bus 12c – OSB-398016 – Error loading WSDL

$
0
0

I was completely stuck with Service Bus 12c project deployment from JDeveloper to the Service Bus run time. Every deployment met with the same fate: Conflicts found during publish – OSB-398016, Error loading the WSDL from the repository:  The WSDL is not semantically valid: Failed to read wsdl file from url due to — java.net.MalformedURLException: Unknown protocol: servicebus.

I was completely lost and frustrated – not even a simple hello_world could make it to the server.

SNAGHTMLc3d51e6

Then, Google and Daniel Dias from Link Consulting to the rescue: http://middlewarebylink.wordpress.com/2014/07/17/soa-12c-end-to-end-e2e-tutorial-error-deploying-validatepayment/. He had run into the same problem – and he had a fix for it! Extremely hard to find if you ask me, but fairly easy to apply.

It turns out this is a known bug (18856204). The bug description refers to BPM and SB being installed in the same domain.

The resolution:

Open the Administration Console for the WebLogic Domain. From the Services node, select service OSGi Frameworks:

image

Click on the bac-svnserver-osgi-framework link. Note: if you run in production mode, you will now first have to create an edit session.

Add felix.service.urlhandlers=false in the Init Properties field for the configuration of this service. Then press the Save button.

image

If you run in Production Mode, you now have to commit the edit session.

Then, in order have this modification make any difference, you have to restart the WebLogic (Admin) Server.

This resolved the issue for me – a weight was lifted of my shoulders. Thanks to Daniel from Link!

The post Resolving deployment issues with Service Bus 12c – OSB-398016 – Error loading WSDL appeared first on AMIS Technology Blog.


Setup GMail as mail provider for SOA Suite 12c – configure SMTP certificate in trust store

$
0
0

On this subject, there are already many fine articles. I have borrowed from at least a dozen to understand what should happen and to make it work. You will find them listed under resources.

It all started with me trying to have the UMS Adapter send an email. The setup of the email driver was done in EM FMW Control (see below) and I expected my email to be sent successfully. After a considerable and increasingly anxious wait at my mail client, I decided to check the log file for my WebLogic domain. There it was, in the soa_server1.out for my SOA Suite managed server:

javax.mail.MessagingException: Could not connect to SMTP host: smtp.gmail.com, port: 465;
nested exception is:
javax.net.ssl.SSLHandshakeException: sun.security.validator.ValidatorException: PKIX path building failed: sun.s
ecurity.provider.certpath.SunCertPathBuilderException: unable to find valid certification path to requested target
at com.sun.mail.smtp.SMTPTransport.openServer(SMTPTransport.java:1934)
at com.sun.mail.smtp.SMTPTransport.protocolConnect(SMTPTransport.java:638)

And I knew I had seen something like that before. And tried to work around it. Use an email provider that did not use SSL based communication for example. However, this time I decided to bite the bullet. And get this settled, once and for all. Now that I have it running, it does not feel like such a big deal anymore. But I do remember my frustrations of yesterday. So here are the steps, for your convenience and my own future pleasure alike.

The background by the way is that when I set up GMail as the Outgoing Mail Server, I configured an SMTP server (smtp.gmail.com) that uses SSL for its (trusted) communications. The JVM is perfectly willing to conduct such communications for us – as long as it knows that we actually trust the party we are doing SSL with. We have to tell the JVM that it is okay to have such communications. And we do that by loading the public key of a SSL certificate in the JVM’s trust store. Note that the exact same thing is required for SSL interactions with other providers, such as Twitter and Dropbox – all using SSL as well. When we want to interact from our SOA Suite domain with these parties we too have to follow the steps in this article.

The steps are these:

  • Retrieve certificate for smtp.gmail.com using OpenSSL
  • Create a text file with only the certificate
  • Load the certificate into the keystore
  • Restart WebLogic Domain

Note: the steps are described for Linux but should be almost identical on Windows and other operating systems.

Retrieve certificate for smtp.gmail.com using OpenSSL

Using the OpenSSL tool, we can retrieve the certificate from the server that we want to have our JVM interact with later on. For GMail – and more specifically GMail’s SMTP server for outbound email, we use this command to save its SSL certificate to the file called gmail-smtp-cert.pem. You can choose any name for the local file – as long as you remember it until the next step. The extension .pem is typically used because openssl creates the file in the PEM format.

openssl s_client -connect smtp.gmail.com:465 > gmail-smtp-cert.pem

The file gmail-smtp-cert.pem should be created now. Note: this openssl action can take a long time or not even finish at all. You can end it after a few seconds (CTRL+C for example) because the important part is done very quickly and right at the beginning.

Create a text file with only the certificate

This step can easily go wrong if you do not read carefully. Took me considerable time – not going to tell you how long exactly.

Open the file you retrieved with OpenSSL – gmail-smtp-cert.pem in my case – in an editor (such as vi).

image

Remove all the lines before the line that says —–BEGIN CERTIFICATE—– – but leave this line itself! Also remove all lines after the line with —–END CERTIFICATE—– but again, leave this line itself. Save the resulting file, for example as gmail-smtp-certificate.txt (but you can pick any name you like).

image

Load the certificate into the keystore

WebLogic (on which SOA Suite is running) out of the default installation uses a special keystore. It does not use the cacerts store that is installed with the JDK or JRE but instead uses a file called DemoTrust.jks and typically located at %WL_HOME/server/lib/DemoTrust.jks. This trust store is “injected” into the JVM when the WebLogic domain is started: “-Djavax.net.ssl.trustStore=/opt/oracle/middleware12c/wlserver/server/lib/DemoTrust.jks”. We have the option of removing this start up parameter: remove “-Djavax.net.ssl.trustStore=%WL_HOME%\server\lib\DemoTrust.jks” in setDomainEnv.cmd  and then add the certificates to the default Java keystore (cacerts) or, the easier option, we can add the certificate to the DemoTrust keystore that WebLogic uses.

The command for doing this, looks as follows:

%JAVAHOME%/jre/bin/./keytool -import -alias -keystore /opt/oracle/middleware12c/wlserver/server/lib/DemoTrust.jks -file 

in my case that is:

/usr/java/latest/jre/bin/./keytool -import -alias smtp.gmail.com -keystore %WL_HOME%/server/lib/DemoTrust.jks -file /var/log/weblogic/gmail-smtp-certificate.txt

Because the DemoTrust keystore is owned by OS user oracle, I can/have to execute this command as that user.

You will be prompted for the password for this keystore. The default password of the DemoTrust keystore is: DemoTrustKeyStorePassPhrase.


image

You will be asked explicitly whether you trust this certificate [and are certain about adding it to the keystore]. Obviously you will have to type y in order to confirm the addition to the keystore:

image

Restart WebLogic Domain

The change in the keystore is (probably?) only picked up by the JVM after it is restarted. So if your WLS domain is running, bring it down and start it up again. Now send that email again. It should work.

Configure UMS Email Driver for sending emails with GMail

The UMS Email Driver on the SOA Suite managed server has to be informed about our intention to use GMail for sending email. More to the point: we have to configure smtp.gmail.com as the outbound mail server. We do so in the UMS email driver, in the Enterprise Manager Fusion Middleware Control. Open the node User Messaging Service and select the usermessaingdriver-email node for the managed server that runs the SOA Suite (SCA composite engine). From the dropdown menu, open option Email Driver Properties:

image

Click on the green plus icon to create a new configuration for the Email Driver:

image

In the next page with Email Driver properties, you should specify the default sender address – the mail account from which to send emails (when a message being sent has no explicit sender address):

image


Scroll down a little to set the properties for the SMTP server. Set the outgoing mail server to smtp.gmail.com. The outgoing mail server port is 465, the mail server security should be set to SSL. The outgoing username – used by UMS to connect to GMail – should be set to your full email address at GMail. Either set your Google password as a cleartext password or use indirect password to have the password stored in the credential store mapped, see for example here).

SNAGHTML48c218b

Click the OK button to save the email driver configuration’s properties and be returned to the overview page.

image

Send test email from Enterprise Manager FMW Control

Open the Enterprise Manager FMW Control. Select the SOA | soa-infra node and from the dropdown menu select the option Service Engines | Human Workflow:

image

The Human Workflow Engine page appears. Open the tab Notification Management. Click on the button Send Test Notification.

image

A popup appears, allowing me to enter the details for a test mail I would like to send:

Enter the relevant details and press the Send button:

image

A minor set back appears: “exception.code:31018 exception.type: ERROR exception.severity: 2 exception.name: Incorrect Notification Configuration. exception.description: Incorrect Configuration : NotificationMode : NONE; Channel : email. exception.fix: NotificationMode in workflow-notification-config.xml should be either EMAIL or ALL to send Email notifications; It should be ALL to send any other type of notifications.”

image

That sounds a little familiar. This means that we still have to configure the workflow notification properties. Once again, with the soa-infra node selected, open the dropdown menu and select SOA Administration | Workflow Properties:

image

In the page that appears next, set the Notification Mode to All or at least to Email. Press Apply to make the change last.

image

Confirm the changed properties once again:

image

After making this change, I return to the page to send my test notification again. Unfortunately, the minor setback is still there. Perhaps a restart of the managed server for SOA Suite is required? I sincerely would hope not, but let’s try it anyways.

… after several minutes and one server restart …

Return to the page for sending a test notification:

image

and now it subtly informs me that the message was indeed sent:

image

Which I can confirm in my Outlook mail client:

image

Resources

Instructions on Using Gmail as a JIRA Mail Server (download certificate)

Probably the best resource – should have started there – Using GMail as Mail Server for Oracle SOA Suite 11g Notifications by Rommel Pino

Also very good: http://marcotello.com/oracle-soa-suite/configuring-oracle-soa-suite-ums-adapter-with-a-gmail-account/ by Marco Tello

Gmail Notification Service – Oracle Fusion Middleware School – http://www.orafmwschool.com/gmail-notification-service/

What Are the Gmail SMTP Settings? – http://email.about.com/od/accessinggmail/f/Gmail_SMTP_Settings.htm

How do I retrieve remote certificate with openSSL – http://www.madboa.com/geek/openssl/#cert-retrieve

Email Notification with SOA Suite 11g by Craig Barr of Rubicon Red – http://www.rubiconred.com/email-notification-soa-suite-11g/

How to register SSL certificates in your JVM? by Alexandre de Pellegrin - http://javacolors.blogspot.nl/2012/05/how-to-register-ssl-certificates-in.html

The post Setup GMail as mail provider for SOA Suite 12c – configure SMTP certificate in trust store appeared first on AMIS Technology Blog.

Configuring Chat in SOA Suite 12c with the XMPP driver in the UMS Adapter

$
0
0

Chatting or instant messaging is a valuable for of communication, somewhere between email (very asynchronous) and telephone/Skype/VoiP/HangOut (synchronous) and quite similar to SMS. Unfortunately, there is has been an explosion in the number of IM protocols and services, many of which cannot talk to each other. Whatsapp is perhaps the most popular chat-like service, but it lives on its own. Google Talk (now assimilated into GMail and Google Hangouts) started as a relatively open service (based on the XMPP standard for IM), but is now largely proprietary. AOL, MSN, ICQ, Facebook, Skype, Twitter – many different largely closed networks within in which users can interact in char-style. But unfortunately hardly across which. Not like emails for example that float freely between domains, servers and vendor technologies.

Having said all that, XMPP is still supported by many tools and servers – and it is still used by large numbers of users. Not just for chatting, but for other types of push-style interaction. See this Slideshare presentation for a nice intro into XMPP. Note that it mentions some attempts to create gateways to connect the worlds of XMPP, Skype, AOL/AIM, IRC.

The goal of this article is not to commiserate over XMPP. It is to show you how SOA Suite can be configured to participate in XMPP based conversations – for now only as a sender of messages (we will discuss inbound integration with XMPP in a later article). In SOA Suite 12c, the functionality that was already available from the UMS (User Messaging Service) and the UMS Adapter in SOA Suite 11g has been continued and a little bit extended. I will show you what it looks like and how to make it to work.

Steps:

  • Get access to two IM accounts on an XMPP server: one to send the chat message from (the account you will set up in the XMPP driver) and one to send the test message to; you probably also need a chat client to see the chat message arriving
  • Ensure that the UMS Adapter and the associated applications and libraries are deployed to the managed server that is running the SOA Suite run time (and are up and running)
  • Create the configuration for the XMPP Driver (on the SOA Suite managed server)
  • Enable the Human Workflow engine’s notification service to support the IM channel
  • Send a test message from the SOA Suite to a destination IM address

Note: you may have to restart the WebLogic managed server somewhere along the line (I did, after making some of the configuration changes)


Get access to two IM accounts on an XMPP server

There are many services offered on the internet where you can easily create free XMPP chat accounts. I have made use of two of these – https://duck.co/ and http://www.einfachjabber.de but you can of course create your own. At DuckDuckGo I created an account called saibotcustomer ( @dukgo.com) – this account is used for the fictitious airport Saibot Airport in Lexville that is central in the case for the Oracle SOA Suite 12c Handbook that I am in the middle of writing). At einfachjabber.de I created an account called saibot.airport (@einfachjabber.de). This second account will represent the information desk of the imaginary airport. This account will be the one used to configure the XMPP driver in the SOA Suite run time environment.

image

There are also many clients that will help you interact with XMPP servers and with your chat contacts. I have used the open source Pidgin client for this example: http://pidgin.im/. This client can connect with many other chat (IM) services in addition to XMPP, although that is not relevant for me in this case.

In Pidgin, you can manage multiple XMPP (and other protocol) accounts – and interact through each of them.

I have added both accounts relevant to this article in Pidgin:

SNAGHTML69fefdc

For the account on the einfachjabber.de server, the account configuration is shown next:

SNAGHTML6a0ccd2

I have checked whether the two accounts can actually send messages to each other. First they added one another as authorized buddies:

Here we have account SaibotCustomer@dukgo.com add saibot.airport@einfachjabber.de as his new best buddy – using the local alias Saibot Airport Administration.


image

The account saibot.airport@einfachjabber.de has to accept this buddy request, or customer has to accept the reverse request from the Saibot Airport (to add the customer as Travelling Customer to his buddy group called Customers):

SNAGHTML6b1d9ae

Pidgin presents this dialog to the customer:

image

For example: as saibotcustomer(@dukgo.com), we can now start a new conversation with our new best buddy:

SNAGHTML6b3b29f

Ask for help:

SNAGHTML6b40225

The Saibot Airport administrators receive that message, and respond instantaneously:

image

Their response goes to the customer

image

and we have now established that the two accounts are working, Pidgin is doing a fine job of connecting to both and they can talk to each other. The question now is: can the SOA Suite also talk to the customer, on behalf of the Saibot Airport staff?

Ensure that the UMS Adapter and the associated applications and libraries are deployed and running

After creating a fresh installation with the Oracle Installer – configuring separate managed servers for SOA Suite (soa_server1) and Service Bus (osb_server1) next to the AdminServer – I discovered when I fired up my WebLogic domain that the libraries and applications required for doing the XMPP conversations were installed, but not yet deployed to the soa_server1 target.

In short, when you go into the WLS Console and open the Deployments overview, you have to check these two libraries

image

and these enterprise applications

image

and make sure that they are all deployed, targeted to the managed server with the SOA Suite run time (in my case soa_server1) and have status Active:

Note: I ran into some errors. The usermessagingdriver-xmpp application would not start. It ended up from New in state Prepared. On closer inspection, the soa_server1.out log file contained this message:

<Aug 5, 2014 3:41:57 PM CEST> <Warning> <oracle.sdpinternal.messaging.driver.xmpp.XMPPResourceAdapter> <SDP-26200> <An exception was caught. oracle.sdp.messaging.driver.DriverException: XMPPDriver could not initialize.

        at oracle.sdpinternal.messaging.driver.xmpp.XMPPResourceAdapter.createDriver(XMPPResourceAdapter.java:600)

image

This problem occurred when the configuration for the XMPP driver was invalid and did not allow the driver to correctly startup. In this specific case I tried to configure the XMPP driver for Google’s chat service – something that I do not believe is possible at this point in time. Or at least, I have given up on it.

At another moment, I saw this message:

<Aug 5, 2014 2:40:40 PM CEST> <Warning> <oracle.sdpinternal.messaging.driver.xmpp.XMPPResourceAdapter> <SDP-26249> <No configuration was found for this XMPP Driver deployment: usermessagingdriver-xmpp. Driver disabled until a configuration is created.>

It was present in the log file before I had created the XMPP Driver configuration (see the next section) (and after I had deleted that configuration).

When I tried to send an IM message, I also noticed this error:

<Aug 5, 2014 2:43:34 PM CEST> <Warning> <oracle.sdpinternal.messaging.DriverLocatorImpl> <SDP-25087> <No matching driver found for delivery type = IM.>

which was the result of the previous message: no (valid) configuration was found and there the XMPP driver was not available at all. The remedy clearly was to add a valid configuration.

Create the configuration for the XMPP Driver (on the SOA Suite managed server)

Open the EM FMW Control. Click on the node User Messaging Service | usermessagingdriver-xmpp (soa_server1). Note: soa_server1 is the name of the managed server; in your environment this managed server may have a different name.

In the right side of the page, open the dropdown menu and select XMPP properties:

image

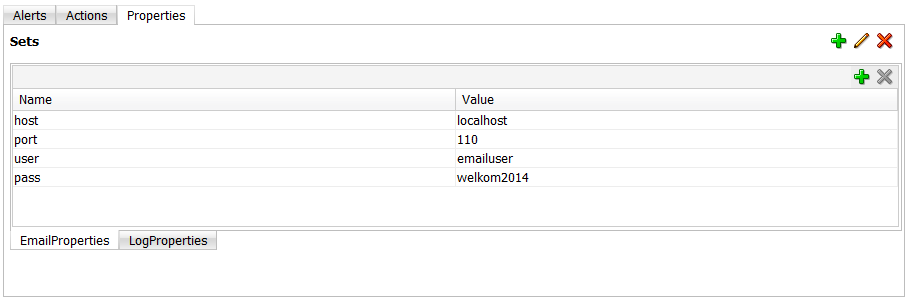
The properties page opens. The important fields to set are:

  • IM Server Host – set to the domain of the XMPP Server on which the account is located that is used for sending messages; in my example that is einfachjabber.de
  • IM Server Port – this is 5222 by default (for almost all XMPP servers)
  • IM Server Username – the account name (with or without domain) for the XMPP server account that is used to send messages from (and receive messages into); in my case that would be saibot.airport or saibot.airport@einfachjabber.de
  • IM Server Password – the password for the account configured under IM Server Username.

Note: I am not sure whether the sender address has to be specified as well. I have set it to IM:saibot.airport@einfachjabber.de and it works – but if it is necessary or even relevant, I am not sure.

SNAGHTML7d80a93

After pressing OK, the XMPP driver configuration is created, as is shown in this screenshot:

image

Enable the Human Workflow engine’s notification service to support the IM channel

We still have to configure the workflow notification properties. Once again, with the soa-infra node selected, open the dropdown menu and select SOA Administration | Workflow Properties:

image

In the page that appears next, set the Notification Mode to All . Press Apply to make the change last.

image

Confirm the changed properties once again:

image

At this point, you may need to restart the managed server – to me it seemed necessary, but maybe first try the next section without a resort and keep it in mind when you run into an error mentioning the Notification Mode.

Send a test message from the SOA Suite to a destination IM address

Select the node SOA | soa-infra. Open the dropdown menu and select Service Engines | Human Workflow.

image

Open the tab Notification Management.

image

Click on Send Test Notification.

In the popup that opens next, set the Channel to IM. Type the destination XMPP account (in my example saibotcustomer@dukgo.com) in the Send To field. Note: this should not be the account configured in the XMPP Driver configuration, because that is the account from which the message is sent. The subject is not relevant for instant messaging. The content however is. Press the Send button.

image

The UMS is invoked using the XMPP Driver configuration and if all was set up correctly, the chat message is now being sent:

image

In our chat client (Pidgin in my case) the test message should arrive shortly:

image

This proves that our configuration is correct.

The Notification Management tab contains an overview of the Outgoing Notifications that have been sent. Here we see an entry for the test message that was sent through the IM channel.

image

Further steps

Now that we know that our UMS service is capable of sending chat messages, we can leverage this in SOA composites that use the (outbound) UMS Adapter, configured for the IM channel. Simple SOA composites (or complex ones for that matter) can easily send out chat messages to human partners (or anyone with an XMPP account).

SNAGHTML7c1684c


Resources

FMW 12.1.3 documentation on configuring the UMS Adapter: http://docs.oracle.com/middleware/1213/adapters/develop-soa-adapters/ums_adapter.htm#CHDCHJJC

Einfachjabber.de

Pidgin

DuckDuckGo

The post Configuring Chat in SOA Suite 12c with the XMPP driver in the UMS Adapter appeared first on AMIS Technology Blog.

Opaque does not mean: just pass anything in. It has to be base64! JCA Adapters

$
0
0

I only realized just now that the checkbox Native format translation is not required (Schema is Opaque) in many of the JCA adapter (wizard)s that we use with SOA Suite and Service Bus does not mean that the opaqueElement can be fed with just any content whatsoever and it will pass it onwards.

image


I tried to do just that, and ran into various errors, such as

Caused By: ORABPEL-11101

Translation Failure.
Translation to native failed. IO Failure in translator.
IO failure because the   translator failed to   to copy InputStream to OutputStream. .
Check the error stack and fix the cause of the error. Contact oracle support if error is not fixable.
.
The data does not conform to the NXSD schema. Please correct the problem.

        at oracle.tip.pc.services.translation.xlators.opaque.OpaqueTranslator.translateToNative(OpaqueTranslator.java:35
0)
        at oracle.tip.adapter.jms.outbound.JmsProducer.translateToNative(JmsProducer.java:106)
        at oracle.tip.adapter.jms.outbound.JmsProducer.constructOutboundAdapterMessage(JmsProducer.java:201)
        at oracle.tip.adapter.jms.outbound.JmsProducer.execute(JmsProducer.java:339)

image

and in the stacktrace:

Caused By: com.sun.mail.util.DecodingException: BASE64Decoder: Error in encoded stream: needed 4 valid base64 characters
but only got 3 before EOF, the 10 most recent characters were: “5T12:00:12″
        at com.sun.mail.util.BASE64DecoderStream.decode(BASE64DecoderStream.java:256)
        at com.sun.mail.util.BASE64DecoderStream.read(BASE64DecoderStream.java:144)

image

As it turns out, whatever is fed to the opaque element in the opaque ‘schema’ should in fact be base64 encoded data! Not just any string or XML block – as I originally thought.

And as it also happens: it is not so simple taking any piece of text of XML and turning it into base64. There is no standard XPath function available to perform this encoding. (I have to research whether perhaps the native format translation in SOA Suite 12c can be used for this). There are several resources on the internet by friends and peers that explain how a BPEL Java Embedded activity can be created to do the job, or a Java Call out in Service Bus or even a custom XPath function:

Edwin Biemond on Java Embedded activity in BPEL for Base64 encoding http://biemond.blogspot.nl/2011/09/base64-encoding-in-oracle-bpel-11g.html

Maarten Smeets on a Custom XPath functions to do the Base64 encoding from within any component that can uses XPath: http://javaoraclesoa.blogspot.nl/2012/03/base64encode-and-base64decode-in-bpel.html 

The SOA Guy on a Java Call out from Service Bus – http://thesoaguy.com/?p=63

A very good introduction into Base64 is provided by Ramkumar Menon’s Blog: https://blogs.oracle.com/rammenon/entry/base64_explained

The post Opaque does not mean: just pass anything in. It has to be base64! JCA Adapters appeared first on AMIS Technology Blog.

Oracle SOA Suite 12c: The LDAPAdapter, a quick and easy tutorial

$
0
0

In enterprises, LDAP servers are often used to store user credentials and groups and share them among applications. Oracle SOA Suite 12c introduces a new technology adapter; the LDAPAdapter which allows easy integration with LDAP servers. In this blog post I will provide a quick and easy howto on installation of an LDAP server and browser (ApacheDS and Apache Directory Studio). I will also describe the configuration required to use the LDAPAdapter and provide an example BPEL process which allows creation of new users in the ApacheDS LDAP server by means of webservice calls.

IntroSOASuiteLDAP

Setting up the LDAP server

Installing an LDAP server

For this example I’ll use ApacheDS as LDAP server and Apache Directory Studio as LDAP browser. First download and install Apache Directory Studio from http://directory.apache.org/studio/. Next create an LDAP server. Click the LDAP server tab in the bottom left corner and click New Server.

CreateNewLDAPServer

Select ApacheDS 2.0.0 and click finish.

CreateNewLDAPServer2

Now you can start the server by selecting it and clicking the green play button.

Create a connection to the LDAP server

Next to the LDAP Servers tab, there is a Connections tab. Create a new connection. Use localhost and port 10389.

CreateNewLDAPServer3

Click Next and fill in the following credentials: Bind DN or User: uid=admin,ou=system and Bind password: secret.

CreateNewLDAPServer4

You can now connect to your newly created server and browse it.

CreateNewLDAPServer5

Configuring Weblogic

Target the adapter

In Weblogic Server you need to configure a connection factory in the adapter configuration. First login to Weblogic console and click on the LdapAdapter.

CreateWeblogic01

The adapter is by default not targeted. You should specify a target if you want to use it. In my case (JDeveloper integrated Weblogic server) only one target can be selected: DefaultServer. Set the target and save.

CreateWeblogic02
This is required in order to access the connection factories provided by the adapter and for example browse for them in JDeveloper.

Configure the connection factory

Go to the configuration of the LdapAdapter, Outbound Connection Pools.

CreateWeblogic03

I decided to configure eis/ldap/master. Click on that and provide the required settings (see screenshot).

CreateWeblogic04

The first time when configuring a connection factory for an adapter, Weblogic asks for the name of the configuration plan to use. It’s a good practice to use a name which makes clear for which adapter the configuration is (or put it in a separate directory per adapter). For example PlanLdap.xml.

After the configuration is complete, restart the server. The LdapAdapter cannot be updated like the DbAdapter. It is more similar to the BamAdapter in behavior. The adapter is deployed upon server start. Upon deployment, a configuration change is applied.

JDeveloper

Configuring the LdapAdapter

Create an application, create an empty project with a synchronous BPEL 2.0 process. In the composite editor, drag the new LDAP adapter to the References lane to start configuring. The default password is still secret.

CreateJDeveloper01

Using the browse button (magnifying glass after the JNDI Name field). You can select the eis/ldap/master. If you can’t, you forgot to target the adapter.

CreateJDeveloper02

Choose ‘Add’ as the outbound operation. Use the following classes: inetOrgPerson and person. Use uid, userPassword as fields.

CreateJDeveloper03

Now you can Next, Finish to the end of the wizard and fill in details of the BPEL process calling the LDAP Server.

Seeing it work

I’ve created a small BPEL process which calls the adapter. Since it’s relatively easy I will not provide screenshots for it. Mind the following though: the userPassword should be at least 5 characters and should not contain the username. I’ve chosen ‘Welcome01′ for this. The dn should be as can be seen in the below screenshot example. You can create it by means of concatenation. Using the Test Webservice screen from Fusion Middleware Control, we can see my service can successfully call the LDAP server.

CreateWorks01

CreateWorks02

In Apache Directory Studio you can confirm the user actually has been created.

CreateWorks03
Check to see if a user is actually created in the LdapServer! The LdapAdapter will return success even if it has failed (or the server did not return a correct failure result). For example after a successful request, I could see in the domain log file entries like:

org.opends.sdk.ConstraintViolationException: Constraint Violation: CONSTRAINT_VIOLATION: failed for MessageType : ADD_REQUEST
Message ID : 6
Add Request :
Entry
dn[n]: uid=maartenmaarten,ou=users,ou=system
objectClass: inetOrgPerson
objectClass: person
uid: maartenmaarten
userPassword: '0x6D 0x61 0x61 0x72 0x74 0x65 0x6E 0x6D 0x61 0x61 0x72 0x74 0x65 0x6E '
sn: maartenmaarten
cn: maartenmaarten
: Password shouldn't contain parts of the username
at org.opends.sdk.ErrorResultException.wrap(ErrorResultException.java:164)
at com.sun.opends.sdk.ldap.AbstractLDAPFutureResultImpl.setResultOrError(AbstractLDAPFutureResultImpl.java:159)
at com.sun.opends.sdk.ldap.LDAPClientFilter$1.addResult(LDAPClientFilter.java:93)
at com.sun.opends.sdk.ldap.LDAPClientFilter$1.addResult(LDAPClientFilter.java:73)

The user was not created in this case. In a process flow you can of course also use the LdapAdapter again to search for the user you have just created to confirm it was successful.

Conclusion

In this quick howto I have used the example of adding a user by means using the new Oracle SOA Suite 12c LdapAdapter. Of course there are many situations in which this adapter will useful and the adapter is capable of much more then what I’ve just described. Read for example http://docs.oracle.com/middleware/1213/adapters/develop-soa-adapters/adptr_ldap.htm#TKADP2901. Other use cases for the adapter could be if you have users stored in different systems and want to create users in all of them by means of a single service call or if you want to use information (such as groups or e-mail addresses) available from a provided LDAP server. Using the LdapAdapter, you can provide an abstraction to certain LDAP operations by means of services and make the LDAP server part of the integration effort instead of leaving it out or having to build custom integrations for it.

The post Oracle SOA Suite 12c: The LDAPAdapter, a quick and easy tutorial appeared first on AMIS Technology Blog.

SOA Suite 12c: Configuring GMail as the inbound email provider for UMS (IMAP, SSL)

$
0
0

In a recent article, I discussed how to configure the SOA Suite 12c for sending emails using GMail: http://technology.amis.nl/2014/08/05/setup-gmail-as-mail-provider-for-soa-suite-12c-configure-smtp-certificate-in-trust-store/. An interesting aspect of that configuration is the loading of the GMail SSL certificate into the Keystore used by WebLogic, in order for the SSL based interaction with GMail to successfully be performed. The configuration of GMail for inbound interactions requires a similar procedure for the certificate for the imap.gmail.com server.

This article quickly presents the steps required for getting this inbound interaction going, from the expected error:

image

<Aug 17, 2014 3:50:22 PM CEST> <Error> <oracle.sdpinternal.messaging.driver.email.inbound.ImapEmailStore> <SDP-26123>
ould not initialize Email Store for: user saibot.airport@gmail.com, server imap.gmail.com, folder INBOX, sslEnabled tr
javax.mail.MessagingException: sun.security.validator.ValidatorException: PKIX path building failed: sun.security.prov
er.certpath.SunCertPathBuilderException: unable to find valid certification path to requested target;
  nested exception is:
        javax.net.ssl.SSLHandshakeException: sun.security.validator.ValidatorException: PKIX path building failed: sun
ecurity.provider.certpath.SunCertPathBuilderException: unable to find valid certification path to requested target
        at com.sun.mail.imap.IMAPStore.protocolConnect(IMAPStore.java:665)
        at javax.mail.Service.connect(Service.java:295)
        at javax.mail.Service.connect(Service.java:176)
        at oracle.sdpinternal.messaging.driver.email.inbound.ImapEmailStore.initStore(ImapEmailStore.java:159)
        at oracle.sdpinternal.messaging.driver.email.inbound.ImapEmailStore.initStore(ImapEmailStore.java:106)

to the final successful reception of an email:

image


Load Certificate into Keystore

The interaction between the UMS server and GMail’s IMAP API takes place over SSL. That means that the WebLogic managed server on which the UMS service runs has to have the SSL certificate for the IMAP server loaded in its local keystore – in the exact same way that we needed to load the SMTP server’s certificate in order to be able send emails via GMail (http://technology.amis.nl/2014/08/05/setup-gmail-as-mail-provider-for-soa-suite-12c-configure-smtp-certificate-in-trust-store/).

The steps are a little familiar by now,  at least to me.

Download the certificate from Google and store it in a file. Depending on your operating system, this can be done in various ways. On Linux, here is a possible command:

openssl s_client -connect imap.gmail.com:993 > gmail-imap-cert.pem

image

The file gmail-imap-cert.pem should be created now. Note: this openssl action can take a long time or not even finish at all. You can end it after a few seconds (CTRL+C for example) because the important part is done very quickly and right at the beginning.

image

Open the file you retrieved with OpenSSL – gmail-imap-cert.pem in my case – in an editor (such as vi).

Remove all the lines before the line that says —–BEGIN CERTIFICATE—– – but leave this line itself! Also remove all lines after the line with —–END CERTIFICATE—– but again, leave this line itself. Save the resulting file, for example as gmail-imp-certificate.txt (but you can pick any name you like).

SNAGHTML20f4d3f

image

WebLogic (on which SOA Suite is running) out of the default installation uses a special keystore. It does not use the cacerts store that is installed with the JDK or JRE but instead uses a file called DemoTrust.jks and typically located at %WL_HOME/server/lib/DemoTrust.jks. This trust store is “injected” into the JVM when the WebLogic domain is started: “-Djavax.net.ssl.trustStore=/opt/oracle/middleware12c/wlserver/server/lib/DemoTrust.jks”. We have the option of removing this start up parameter: remove “-Djavax.net.ssl.trustStore=%WL_HOME%\server\lib\DemoTrust.jks” in setDomainEnv.cmd  and then add the certificates to the default Java keystore (cacerts) or, the easier option, we can add the certificate to the DemoTrust keystore that WebLogic uses.

The command for doing this, looks as follows, in my environment at least:

/usr/java/latest/jre/bin/./keytool -import -alias imap.gmail.com -keystore /opt/oracle/middleware12c/wlserver/server/lib/DemoTrust.jks -file /var/log/weblogic/gmail-imap-certificate.txt

image

The default password for the keystore is DemoTrustKeyStorePassPhrase.

You will be asked explicitly whether you trust this certificate [and are certain about adding it to the keystore]. Obviously you will have to type y in order to confirm the addition to the keystore:

image

When done, we can check the contents of the keystore using this command:

/usr/java/latest/jre/bin/./keytool -list -keystore  /opt/oracle/middleware12c/wlserver/server/lib/DemoTrust.jks

SNAGHTML20d47e3

Next, you have to restart the WebLogic Managed Server – and perhaps the AdminServer as well (I am not entirely sure about that, but I did it anyway)


Email Driver Properties

In EM FMW Control, open the User Messaging Service node in the navigator and select the usermessagingdriver-email for the relevant managed server. From the context menu, select Email Driver Properties. When there no configuration yet, you will create a new one. If you already configured the SOA Suite for outbound mail traffic, you can edit that configuration for the inbound direction.


image

In the property overview, there are some properties to set:

image

The Email Receiving protocol for GMail is IMAP. The Incoming Mail Server is imap.gmail.com. The port should be set to 993 and GMail wants to communicate over SSL, so the checkbox should be checked. The Incoming MailIDs are the email addresses that correspond to the lust names under Incoming User IDs. For GMail these can both be the full GMail email-addresses, such as saibot.airport@gmail.com, an account created for the Oracle SOA Suite 12c Handbook that I am currently writing. There are several ways to configure the password. The least safe one is by selecting Use Cleartext Pasword and simply typing the password for the GMail account in the password field. The password is then stored somewhere on the WebLogic server in readable form.

Press the OK button at the top of the page to apply all configuration changes.

image


SOA composite application with Inbound UMS Adapter binding

I have created a very simple composite. The (really the only) interesting aspect is the Inbound UMS Adapter on the left. This adapter binding when deployed negotiates with the UMS services on the WebLogic platform to have the configured mailbox polled and to have an instance of this composite created for every mail that was received. Note that we could have configured message filters to only trigger this composite for specific senders or subjects.

image

The inbound UMS adapter is configured largely with default settings – apart from the name (ReceiveEmail), the steps through the wizard are these:

SNAGHTML1f3fc90

SNAGHTML1f4916f

SNAGHTML1f4a58b

Specify which of the accounts that are configured on the UMS email-driver is associated with this particular adapter binding (note: this means that the value provided here for the end-point has to be included in the Incoming MailIDs property set on the email driver)

SNAGHTML1f4badf

Let’s process the mail content as a string – no attempt to natively transform. Note that many associated properties are available inside the SOA composite from the jca header properties.

SNAGHTML1f69ae1

Do not need Message Filters for this simple test:

SNAGHTML1f78a9c

Nor any custom Java to determine whether to process it. See for example this article for details on this custom Java callout: http://technology.amis.nl/2013/04/07/soa-suite-definitive-guide-to-the-ums-adapter-11-1-1-7/ 

SNAGHTML1f7d246

Press Finish to complete the adapter configuration.

Deploy the SOA composite to the SOA Suite run time. Send an email to the address that is being polled by the inbound UMS adapter:

image

Wait for a little while (about 15 seconds on average, with our current settings). Then check the EM FMW Control for new instances of our composite:

image

And check the contents of the message processed by the Mediator:

image

and scroll:

image

Yes! We did it.

The post SOA Suite 12c: Configuring GMail as the inbound email provider for UMS (IMAP, SSL) appeared first on AMIS Technology Blog.

SOA Suite 12c: Invoke Enterprise Scheduler Service from a BPEL process to submit a job request

$
0
0

The Fusion Middleware 12.1.3 platform contains the ESS or Enterprise Scheduler Service. This service can be used as an asynchronous, schedule based job orchestrator. It can execute jobs that are Operating System jobs, Java calls (local Java or EJB), PL/SQL calls, and Web Service calls (synchronous, asynchronous and one-way) including SOA composite, Service Bus and ADF BC web services.

Jobs and schedules can be defined from client applications through a  Java API or through the Enterprise Manager FMW Control user interface. Additionally, ESS exposes a web service through which (pre defined) jobs can be scheduled. This web service can be invoked from BPEL processes in SOA composites. In this article I will briefly demonstrate how to do the latter: submit a request to the Enterprise Scheduler Service to execute a job according to a specified schedule.

Because the job cannot be executed anonymously, the ESS Scheduler Service has an attached WSM policy to enforce credentials to be passed in. As a consequence, the SOA composite that invokes the service needs to have a WSM policy attached to the reference binding for the ESS Service in order to provide those required credentials. This article explains how to do that.

Steps:

  • Preparation: create an ESS Job Definition and a Schedule – in my example these are SendFlightUpdateNotification (which invokes a SOA composite to send an email) and Every5Minutes
  • Ensure that the ESS Scheduler Web Service has a WSM security policy attached to enforce authentication details to be provided (see description in this article: FMW 12.1.3 – Invoking Enterprise Scheduler Service Web Services from SoapUI)
  • Create a SOA composite application with a one way BPEL process exposed as a SOAP Web Service
  • Add a Schedule Job activity to the BPEL process and configure it to request the SendFlightUpdateNotification according to the Every5Minutes schedule; pass the input to the BPEL process as the application property for the job
  • Set a WSDL URL for a concrete WSDL – instead of the abstract one that is configured by default for the ESS Service
  • Attach a WSM security policy to the Reference Binding for the ESS Scheduler Web Service
  • Configure username and password as properties in composite.xml file – to provide the authentication details used by the policy and passed in security headers
  • Deploy and Test


Preparation: create an ESS Job Definition and a Schedule

in my example these are SendFlightUpdateNotification (which invokes a SOA composite to send an email)

image

and Every5Minutes

image


Ensure that the ESS Scheduler Web Service has a WSM security policy attached

to enforce authentication details to be provided (see description in this article: FMW 12.1.3 – Invoking Enterprise Scheduler Service Web Services from SoapUI)

image

Create a SOA composite application

with a one way BPEL process exposed as a SOAP Web Service

image

Add a Schedule Job activity to the BPEL process

image

and configure it to request the SendFlightUpdateNotification according to the Every5Minutes schedule;

image

image

Leave open the start time and end time (these are inherited now from the schedule)

SNAGHTML62b8333

Open the tab application properties.

SNAGHTML62bc65a
Here we can override the default values for Job application properties with values taken for example from the BPEL process instance variables:

image

SNAGHTML62ce36c


note: in order to select the Job and Schedule, you need to create a database MDS connection to the MDS partition with the ESS User Meta Data

SNAGHTML62abfb6


When you close the Schedule Job definition, you will probably see this warning:

image

Click OK to acknowledge the message. We will soon replace the WSDL URL on the reference binding to correct this problem.

The BPEL process now looks like this:

image

Set a concrete WSDL URL on the Reference Binding for the ESS Service

Get hold of the URL for the WSDL for the live ESS Web Service.

image

image

image

image

Then right click the ESS Service Reference Binding and select Edit from the menu. Set the WSDL URL in the field in the Update Reference dialog.


image

Attach a WSM security policy to the Reference Binding for the ESS Scheduler Web Service

Because the ESS Scheduler Web Service is protected by a WSM Security Policy, it requires callers to pass the appropriate WS Security Header. We can simply attach a WSM policy [of our own]to achieve that effect. We can even do so through EM FMW Control, in the run time environment, rather than right here at design time. But this time we will go for the design time, developer route.

Right click the EssService reference binding. Select Configure SOA WS Policies | For Request from the menu.

image

The dialog for configuring SOA WS Policies appears. Click on the plus icon for the Security category. From the list of security policies, select oracle/wss_username_token_client_policy. Then press OK.

image

The policy is attached to the reference binding.

SNAGHTML66e5071

Press OK again.

What we have configured at this point will cause the OWSM framework to intercept the call from our SOA composite to the EssService and inject WS Security policies into it. Or at least, that is what it would like to do. But the policy framework needs access to credentials to put in the WS Security header. The normal approach with this is for the policy framework to inspect the configured credential store for the username and password to use. The default credential store is called basic.credentials,  but you can specify on the policy that it should a different credential store. See this article for more details: http://biemond.blogspot.nl/2010/08/http-basic-authentication-with-soa.html .

There is a short cut however, that we will use here. Instead of using a credential store, our security policy can also simply use a username and password that are configured as properties on the reference binding to which the policy is attached. For the purpose of this article, that is far more convenient.

Click on the reference binding once more. Locate the section Composite Properties | Binding Properties in the properties palette, as shown here.

image

Click on the green plus icon to add a new property. Its name is oracle.webservices.auth.username and the value is for example weblogic. Then add a second property, called oracle.webservices.auth.password and set its value:

SNAGHTML6760e82

You will notice that these two properties are not displayed in the property palette. However annoying that is, it is not a problem: the properties are added to the composite.xml file all the same:

image

Deploy and Test

The work is done. Time to deploy the SOA composite to the run time.

Then invoke the service it exposes:

image

Wait for the response

image

and inspect the audit trail:

image

When we drill down into the flow trace and inspect the BPEL audit details, we will find the response from the ESS service – that contains the request identifier:

image

At this point apparently a successful job request submission has taken place with ESS. Let’s check in the ESS console:

image

Job request 605 has spawned 606 that is currently waiting:

image

A little later, the job request 606 is executed:

image

We can inspect the flow trace that was the result of this job execution:

image

Note that there no link with the original SOA composite that invoked the scheduler service to start the job that now result in this second SOA composite instance.

After making two calls to the SOA composite that makes the call to the scheduler and waiting a little, the effects are visible of a job that executes every five minutes (and that is started twice):

image

The post SOA Suite 12c: Invoke Enterprise Scheduler Service from a BPEL process to submit a job request appeared first on AMIS Technology Blog.

SOA Suite 12c: Using Enterprise Scheduler Service to schedule deactivation and activation of inbound adapter bindings

$
0
0

The Enterprise Scheduler Service that is available in Fusion Middleware 12.1.3 supports a number of administration activities around the SOA Suite. We will look at one particular use case regarding environment management using the ESS. Suppose we have an inbound database adapter. Suppose we have created the PortalSlotRequestProcessor SOA composite that uses a database poller looking for new records in a certain table PORTAL_SLOT_ALLOCATIONS (this example comes from the Oracle SOA Suite 12c Handbook, Oracle Press). The polling frequency was set to once every 20 seconds. And that polling goes on and on for as long as the SOA composite remains deployed and active.

Imagine the situation where every day during a certain period, there is a substantial load on the SOA Suite, and we would prefer to reduce the resource usage from non-crucial processes. Further suppose that the slot allocation requests arriving from the portal are considered not urgent, for example because the business service level agreed with our account managers is that these requests have to be processed within 24 hours – rather than once every 20 seconds. We do not want to create a big batch, and whenever we can, we strive to implement straight through processing. But between 1 and 2 AM on every day, we would like to pause the inbound database adapter.

In this section, we will use the Enterprise Scheduler Service to achieve this. We will create the schedules that trigger at 1 AM every day, used for deactivating the adapter, and 2 AM, used for activating the adapter. In fact, in order to make testing more fun, we will use schedules that trigger at 10 past the hour and 30 past the hour. These schedules are then associated in the Enterprise Manager Fusion Middleware Control with the inbound database adapter binding PortalSlotRequestPoller.

Create Schedules

An ESS Schedule is used to describe either one or a series of moments in time. A schedule can be associated with one or many Job definitions to come to describe when those jobs should be executed. A recurring schedule has a frequency that describes how the moments in time are distributed over time. A recurring schedule can have a start time and an end time to specify the period during which the recurrence should take place.

To create the schedules that will govern the inbound database adapter, open the EM FMW Control and select the node Scheduling Services | ESSAPP. From the dropdown list at the top of the page, select Job Requests | Define Schedules, as is shown in this figur


image

Click on the icon to create a new schedule. Specify the name of the schedule as At10minPastTheHour. Set the display name to “10 minutes past each hour”. The schedule has to be created in the package [/oracle/apps/ess/custom/]soa. This is a requirement for schedules used for adapter activation.

Select the frequency as Hourly/Minute, Every 1 Hour(s) 0 Minute(s) and the start date as any date not too far in the future (or even in the past) with a time set to 10 minutes past any hour.

image

Note that using the button Customize Times, we can have a long list of moments in time generated and subsequently manually modify them if we have a need for some exceptions to the pattern.

Click on OK to save this schedule.

Create a second schedule called At30minPastTheHour. The definition is very similar to the previous one, except for the start time that should 30 minutes past some hour.

image

Click OK to save this schedule definition.

Note that more sophisticated recurrence schedules can be created through the Java API exposed by ESS as well as through the IDE support in JDeveloper. These options that allow specific week days or months to be included or excluded can currently not set set through the EM FMW Control.

Apply Schedules for Activation and Deactivation of Inbound Database Adapter

Select node SOA | soa-infra | default | PortalSlotRequestProcessor – the composite we created in the previous chapter. Under Services and References, click on the PortalSlotRequestPoller, the inbound database adapter binding.

clip_image002

The PortalSlotRequestProcessor appears. Click on the icon for adapter schedules.

image

In the Adapter Schedules popup that appears, we can select the schedule that is to be used for deactivating and for activating the adapter binding. Use the At10minPastTheHour schedule for deactivation and At30minPastTheHour for activation. Press Apply Schedules to confirm the new configuration.

clip_image003

From this moment on, the inbound database adapter binding that polls table PORTAL_SLOT_ALLOCATIONS is active only for 40 minutes during every hour, starting at 30 minutes past the hour.

For example, at 22:14, the binding is clearly not active.

image


Test switching off and on of Database Adapter binding

When the schedules for activation and deactivation have been applied, they are immediately in effect. You can test this in the Dashboard page for the inbound database adapter binding, as is shown here

clip_image002[5]

Here we see how a single record was processed by the adapter binding, insert at 10:09PM. Four more records were inserted into table PORTAL_SLOT_ALLOCATIONS at 10:13 and 10:14. However, because the adapter binding is currently not active, so these records have not yet been processed.

image

image

At 30 minutes past the hour – 10:30 in this case – the adapter becomes active again and starts processing the records it will then find in the table. Because the adapter was configured to pass just a single record to a SOA composite and not process more than two records in a single transaction, it will take two polling cycles to process the four records that were inserted between 10:10 and 10:30. These figures illustrate this.

image

image

clip_image004


The SOA composite instances that are created for these four records retrieved in two poll cycles:

image

and the flow trace for the instance at 10:30:09 looks like this – processing two separate database records:

image

imageWhen you check in the ESS UI in EM FMW Control, you will find two new Job Definitions, generic Jobs for executing SOA Suite management stuff:

ess_adapteractivation1

In the Job Requests overview, instances of these jobs appear, every hour one of each. And the details of these job requests specify which adapter binding in which composite is the target of the SOA administrative action performed by the job.

ess_adapteractivation2

The post SOA Suite 12c: Using Enterprise Scheduler Service to schedule deactivation and activation of inbound adapter bindings appeared first on AMIS Technology Blog.


Oracle SOA Suite 11g and 12c: Determining composite dependencies to the level of operations

$
0
0

In large companies, often there are many services and dependencies between services. It is important to track service dependencies in order to for example estimate the impact of changes. Design documents or architecture views can be used for this but as everybody knows, there is often a gap between theory and practice (design and implementation).

In this blog post I provide code to determine dependencies between composites to the level of operation calls. In order to achieve this, I’ll parse the composite.xml files, JCA files (used by adapters) and also the BPEL and BPMN files in order to determine the operations. The script can be used for SOA Suite 11g and 12c composites.

2014-09-16 19_06_22-PowerPoint Slide Show - [dependencies.pptx]

The above picture shows different parts of which a composite is composed and how they are linked. The script first determines references. The references specify which external services are called. Then by using wires, the relevant components are determined. Based on the component type, specific logic is used to extract the operation. Not shown in this picture is how database dependencies can also be determined by the script by parsing the JCA files specified in the reference. If you’re in a hurry, you can go to the ‘Executing the script’ part directly and skip the explanation.

Composites

This blog will focus on composites (which can contain components like BPEL and BPM) using the shared SOA infrastructure and not on for example the Service Bus. Composites use the Software Component Architecture (http://www.oasis-opencsa.org/sca) to wire different components together in a consistent way. Oracle uses XML files to describe composites, components and references. These files can easily be parsed and correlated.

Introduction composite.xml

The main file describing a composite is the composite.xml file. Below is a small sample of a HelloWorld composite containing a single component, a BPEL process.
composite.xml
As can be seen, the composite contains properties, services, component definitions and wires which link components to either services or references. This composite has one service: helloworld_client_ep and no references.

Web service references

When I create a new composite which calls this one (HelloWorldCaller), an example can be seen of a reference in the composite of the newly created process.

A reference

This reference contains information on the development time WSDL to be used (ui:wsdlLocation) and the concrete binding at runtime (binding.ws). The ui:wsdlLocation should of course be an MDS path in a production environment (see https://blogs.oracle.com/aia/entry/aia_11g_best_practices_for_dec).

The name of the service to be called can be abstracted in various ways from for example the WSDL path if the service is hosted on the SOA infrastructure. On different components the URL can be manually set. Since the method to determine the service name differs per customer/technology, I will not further elaborate on this (service virtualization is a best practice). You can however in most cases use the composite.xml file to determine the service called. This is required in order to link services together, which is necessary in order to visualize dependencies. In my script I’ve used a method to determine the service name from the service WSDL: wsdl_to_servicename.

Determining the operation for BPEL processes

The operation is specified in the invoke action inside a BPEL process. The invoke action partnerLink attribute contains the name of the partnerlink. This partnerlink name corresponds to the name of the reference in the composite.xml. This can be used to select specific operations.

Determining the operation for BPMN processes

BPMN processes are structured differently then BPEL processes. Here Conversations are defined in the BPMN XML file. The Conversations are referred to by Conversationals which have a ServiceCallConversationalDefinition. This definition contains the operation which is called.

JCA references

JCA references are references which call JCA adapters such as the JMSAdapter, the DbAdapter or other adapters. The references in this case are not webservices and the binding in the composite looks a bit different.

CaptureReferenceDb

In this case, the important information is contained in the file referenced by the binding.jca element. The JCA file specified contains the following information in my case.

CaptureReferenceDbJCA

From this JCA file, I can determine the connection factory, package and procedure name. Do keep in mind that you should check if the adapter=”db” and the interaction-spec className attribute is oracle.tip.adapter.db.DBStoredProcedureInteractionSpec if you want to check the PackageName property. Other JCA adapters can be parsed in a similar way.

Executing the script

The script can be downloaded here: https://dl.dropboxusercontent.com/u/6693935/blog/soaparser.zip

In order to execute it, you need Python 2.7 (I have not checked if it works with higher or lower versions). I have used PyDev plugin in Eclipse Luna to develop it. I’m no expert Python programmer so do not use this script as an example on how you should write correct Python scripts. You need to change the path to the root where composites can be searched for recursively.

As you can see in the bottom right part of the screenshot, my testcase contained three services. HelloWorld, HelloWorldCaller which called the process operation on HelloWorld and HelloWorldDb which called the database procedure TESTUSER.UTILS.GET_SYSDATE

2014-09-16 19_31_25-PyDev - SOAParser_nl_amis_smeetsm_soaparser.py - Eclipse

Conclusion

In this blog I have supplied a script to analyse composite dependencies. Some reservations are in order though.

Custom code
Of course, when using interesting specific custom logic to dynamically determine calls at runtime, code to determine dependencies also needs to be written specifically for the implementation. In such cases this script will not suffice.

No runtime dependencies
The script does not analyse a runtime situation but code present in a certain directory. If services have their own independent lifecycle, there might not be a specific directory which contains the state of a complete environment.

No BPEL 10g
For BPEL 10g, the bpel.xml file and the adapter WSDL files can be analyzed in a similar way. At the time of writing, I hope not many customers are still using 10g though.

Further

The method of parsing code to determine dependencies can also be used to extent to other technologies. Such as frontend applications. They can be linked to the services providing a more complete image of the application landscape.

When using a simple visualization tool such as Graphviz (http://www.graphviz.org/) you can visualize the dependencies. It requires the dependencies to be provided in a specific format, the DOT language. This language is relatively easy to generate from a script. Such an image can be very interesting to developers, architects and designers to determine who uses a certain service.

The post Oracle SOA Suite 11g and 12c: Determining composite dependencies to the level of operations appeared first on AMIS Technology Blog.

How Fast Data Is Turned into Fast Information and Timely Action – Oracle OpenWorld 2014

$
0
0

At Oracle OpenWorld 2014, one of my presentations was about the world of real time information – derived from real time data (streaming data, events, big data on the move or fast data for short). In my presentation, I demonstrated and explained the use of the Oracle Event Processor for processing streaming data in real time. I also showed how OEP interacts with the SOA Suite 12c Event Delivery Network and with JMS, Web Sockets and other channels. Finally, I demonstrated how the findings of OEP can be enriched using visualizations, for example with ADF DVT data visualization components.

The slides for this presentation can be downloaded from the OOW content catalog and from SlideShare: http://www.slideshare.net/lucasjellema/how-fast-data-is-turned-into-fast-information-and-timely-action-oow-2014.


The source code for the demonstrations I showed in this session are available from GitHub: https://github.com/lucasjellema/soasuitehandbook/tree/master/ch16.

The post How Fast Data Is Turned into Fast Information and Timely Action – Oracle OpenWorld 2014 appeared first on AMIS Technology Blog.

SOA Suite 12c: Getting started with the Spring Component

$
0
0

The Oracle SOA Suite Spring component has been present since SOA Suite 11.1.1.3 (11gR1 PS2). This component allows easy integration of Java code with other SOA Suite components such as (among others) BPEL, BPM and Business Rules. In SOA Suite 12c (12.1.3.0) this component is still present. In This blog post I will provide a short example on how it can be used and how the first problem I encountered with this component can be avoided.

Oracle Spring

Implementation

First create a SOA Application and an empty project. Next create a Java class with a public method and extract an interface with the public method. You can also supply JARs in the SCA-INF/lib folder of the project with the class/interface.

Extract interface from Java class

The result in this example. The Java class extends the interface.


package nl.amis.smeetsm.springapp;
import org.eclipse.persistence.Version;
public class EclipselinkUtils implements IEclipselinkUtils {
public String getVersion() {
return Version.getVersion().toString();
}
}


package nl.amis.smeetsm.springapp;
public interface IEclipselinkUtils {
String getVersion();
}

Next drag the Spring component from the component palette to the composite editor.

Add Spring Component

Give your new component an understandable name. Open the component. Paste the following (specific to this example);


<sca:service name="EclipselinkUtilsService" target="impl" type="nl.amis.smeetsm.springapp.IEclipselinkUtils">
<interface.java interface="nl.amis.smeetsm.springapp.IEclipselinkUtils"/>
</sca:service>
<bean name="impl" class="nl.amis.smeetsm.springapp.EclipselinkUtils"/>

On the following page; http://www.oracle.com/technetwork/articles/soa/jellema-events-soasuite-1902429.html at ‘Implementing the Spring Bean’ you can find more explanation on how to provide services and references in a Spring Component.

Next in the composite editor, drag the service interface to the services lane and indicate you want a webservice.

Drag and drop

Compile and deploy.

To my own surprise (this was a simple example), the deployment failed.


<Line 43, Column 57>: XML-24509: (Error) Duplicated definition for: 'identifiedType'
<Line 60, Column 28>: XML-24509: (Error) Duplicated definition for: 'beans'
<Line 157, Column 34>: XML-24509: (Error) Duplicated definition for: 'description'
<Line 169, Column 29>: XML-24509: (Error) Duplicated definition for: 'import'
<Line 191, Column 28>: XML-24509: (Error) Duplicated definition for: 'alias'
<Line 220, Column 33>: XML-24509: (Error) Duplicated definition for: 'beanElements'
<Line 235, Column 44>: XML-24509: (Error) Duplicated definition for: 'beanAttributes'
<Line 510, Column 43>: XML-24509: (Error) Duplicated definition for: 'meta'
<Line 518, Column 35>: XML-24509: (Error) Duplicated definition for: 'metaType'
<Line 535, Column 27>: XML-24509: (Error) Duplicated definition for: 'bean'
<Line 555, Column 38>: XML-24509: (Error) Duplicated definition for: 'constructor-arg'
<Line 623, Column 51>: XML-24509: (Error) Duplicated definition for: 'property'
<Line 634, Column 32>: XML-24509: (Error) Duplicated definition for: 'qualifier'
<Line 650, Column 48>: XML-24509: (Error) Duplicated definition for: 'attribute'
<Line 660, Column 36>: XML-24509: (Error) Duplicated definition for: 'lookup-method'
<Line 696, Column 38>: XML-24509: (Error) Duplicated definition for: 'replaced-method'
<Line 733, Column 31>: XML-24509: (Error) Duplicated definition for: 'arg-type'
<Line 760, Column 26>: XML-24509: (Error) Duplicated definition for: 'ref'
<Line 798, Column 28>: XML-24509: (Error) Duplicated definition for: 'idref'
<Line 832, Column 28>: XML-24509: (Error) Duplicated definition for: 'value'
<Line 860, Column 27>: XML-24509: (Error) Duplicated definition for: 'null'
<Line 874, Column 39>: XML-24509: (Error) Duplicated definition for: 'collectionElements'
<Line 892, Column 27>: XML-24509: (Error) Duplicated definition for: 'list'
<Line 915, Column 26>: XML-24509: (Error) Duplicated definition for: 'set'
<Line 936, Column 26>: XML-24509: (Error) Duplicated definition for: 'map'
<Line 957, Column 45>: XML-24509: (Error) Duplicated definition for: 'entry'
<Line 966, Column 28>: XML-24509: (Error) Duplicated definition for: 'props'
<Line 988, Column 26>: XML-24509: (Error) Duplicated definition for: 'key'
<Line 999, Column 27>: XML-24509: (Error) Duplicated definition for: 'prop'
<Line 1018, Column 39>: XML-24509: (Error) Duplicated definition for: 'propertyType'
<Line 1061, Column 41>: XML-24509: (Error) Duplicated definition for: 'collectionType'
<Line 1073, Column 40>: XML-24509: (Error) Duplicated definition for: 'listOrSetType'
<Line 1082, Column 34>: XML-24509: (Error) Duplicated definition for: 'mapType'
<Line 1104, Column 36>: XML-24509: (Error) Duplicated definition for: 'entryType'
<Line 1143, Column 36>: XML-24509: (Error) Duplicated definition for: 'propsType'
<Line 1156, Column 45>: XML-24509: (Error) Duplicated definition for: 'defaultable-boolean'
<Line 17, Column 33>: XML-24509: (Error) Duplicated definition for: 'annotation'
<Line 36, Column 45>: XML-24509: (Error) Duplicated definition for: 'typedParameterType'
<Line 40, Column 38>: XML-24509: (Error) Duplicated definition for: 'exportsType'
<Line 63, Column 45>: XML-24509: (Error) Duplicated definition for: 'registersScopeType'
<Oct 8, 2014 7:01:13 PM CEST> <Error> <ServletContext-/soa-infra> <BEA-000000> <Error during deployment
oracle.fabric.common.FabricException: Deployment Failed: Error occurred during deployment of component: EclipselinkUtilsSpring to service engine: implementation.spring, for composite: StringProject: SCA Engine deployment failure.: org.springframework.beans.factory.xml.XmlBeanDefinitionStoreException: Line 6 in XML document from URL [oramds:/deployed-composites/default/StringProject_rev1.0/Spring/EclipselinkUtilsSpring.xml] is invalid; nested exception is org.xml.sax.SAXParseException; lineNumber: 6; columnNumber: 1523; <Line 6, Column 1523>: XML-24500: (Error) Can not build schema 'http://www.springframework.org/schema/util' located at 'http://www.springframework.org/schema/util/spring-util.xsd'
at oracle.integration.platform.blocks.deploy.StandaloneCompositeDeploymentCoordinatorImpl.coordinateCompositeDeployment(StandaloneCompositeDeploymentCoordinatorImpl.java:109)
at oracle.integration.platform.blocks.deploy.StandaloneCompositeDeploymentCoordinatorImpl.coordinateCompositeDeployment(StandaloneCompositeDeploymentCoordinatorImpl.java:70)
at oracle.integration.platform.blocks.deploy.servlet.BaseDeployProcessor.deployNewComposite(BaseDeployProcessor.java:514)
at oracle.integration.platform.blocks.deploy.servlet.BaseDeployProcessor.deploySARs(BaseDeployProcessor.java:305)
at oracle.integration.platform.blocks.deploy.servlet.BaseDeployProcessor.deploySARs(BaseDeployProcessor.java:157)
Truncated. see log file for complete stacktrace

To work around this you need to replace the line in the Spring XML file:


xsi:schemaLocation="http://www.springframework.org/schema/beans http://www.springframework.org/schema/beans/spring-beans.xsd http://www.springframework.org/schema/tool http://www.springframework.org/schema/tool/spring-tool.xsd http://www.springframework.org/schema/util http://www.springframework.org/schema/util/spring-util.xsd http://www.springframework.org/schema/aop http://www.springframework.org/schema/aop/spring-aop.xsd http://www.springframework.org/schema/cache http://www.springframework.org/schema/cache/spring-cache.xsd http://www.springframework.org/schema/context http://www.springframework.org/schema/context/spring-context.xsd http://www.springframework.org/schema/task http://www.springframework.org/schema/task/spring-task.xsd http://www.springframework.org/schema/jee http://www.springframework.org/schema/jee/spring-jee.xsd http://www.springframework.org/schema/lang http://www.springframework.org/schema/lang/spring-lang.xsd http://www.springframework.org/schema/tx http://www.springframework.org/schema/tx/spring-tx.xsd http://www.springframework.org/schema/jdbc http://www.springframework.org/schema/jdbc/spring-jdbc.xsd http://www.springframework.org/schema/jms http://www.springframework.org/schema/jms/spring-jms.xsd http://www.springframework.org/schema/oxm http://www.springframework.org/schema/oxm/spring-oxm.xsd http://www.springframework.org/schema/mvc http://www.springframework.org/schema/mvc/spring-mvc.xsd http://xmlns.oracle.com/weblogic/weblogic-sca META-INF/weblogic-sca.xsd">

with the much shorter line


xsi:schemaLocation="http://www.springframework.org/schema/beans http://www.springframework.org/schema/beans/spring-beans.xsd http://xmlns.oracle.com/weblogic/weblogic-sca META-INF/weblogic-sca.xsd">

Something with the XML parser supplied with Weblogic server 12.1.3 apparently… (see http://stackoverflow.com/questions/5005901/duplicated-definition-for-identifiedtype)

Confirm it works

After deployment you can test the service to confirm it works.

Conclusion

The Spring component allows for easy integration with other SOA components. In release 12c, the error in 11g when a Java class is not compiled yet (see http://javaoraclesoa.blogspot.nl/2012/03/file-processing-using-spring-component.html) does not occur anymore, which is nice. However we get a different error in return. Luckily it is easily solved and we can enjoy this nice feature.

I’ve not yet found a way to give preference to a local class over the application server classes. I could alter the classpath of the entire server or soainfra but that could have other less pleasant side-effects. Maybe I´ll figure this one out in a later blogpost.

The post SOA Suite 12c: Getting started with the Spring Component appeared first on AMIS Technology Blog.

SOA Suite 12c: Actionable Emails with Human Task service

$
0
0

It is my assumption that inbound and outbound emailing has been configured – for example for a GMail account – as described in these two articles: GMail for inbound mail in SOA Suite 12c and GMail for outbound mail in SOA Suite 12c and that test mails can be sent and received.

The steps are:

  • configure an email driver for SOA Suite for outbound and inbound emails
  • configure an email address (one of the inbound email accounts set up on the email driver configuration) for actionable emails
  • create a Human Task definition for a task that is configured as actionable; assign this task to a user who has an email configured in the LDAP directory
  • deploy the Human Task as part of a SOA Composite; invoke the composite to have the task assigned to the user
  • the user should receive a notification mail message regarding the task assignment with the option to act on the task by clicking a link in the email; clicking such a link will trigger a response email to the actionable email account with appropriate meta-data for the SOA Suite to interpret the response; the user can even add attachments and comments to this task response mail.

We assume the first setp has been taken care of. Once the email driver for the managed server running SOA Suite has been configured for outbound and inbound email interaction, there is really not a lot to do.

Open the menu SOA Administration | Workflow Properties:

image


Ensure that the actionable email address is set:

image

This setting has to consequences (I believe): one is to configure the links for each of the task outcomes that will be included in the actionable emails sent to the users who have been assigned the task and the second one is to correctly poll this inbound email account for incoming emails that are in fact actions on a task.

Unfortunately, after making a change on this page, the managed server has to be restarted.

Configure a user with an email address in our LDAP

Once restarted, let’s make sure that we have at least one user in the embedded LDAP directory in our WebLogic domain with an email address configured.

Open the WebLogic Server Admin Console.  Click on Security Realms in the Domain Structure navigator. Click on the realm myrealm. Click on the tab Users and Groups:

image

Click on user weblogic.

Click on the tab Attributes

Locate atribute mail. Click on the value, define a valid email address and press enter.

image

When weblogic next would login to the BPM Worklist application, he would find a default notification channel configured based upon this email address:

image

Create a Human Task definition that is actionable (and assigned to a user with an email address configured)

We will not discuss all details around creating a SOA composite application, a HumanTask and a BPEL process from which to invoke the Human Task. These can be found in various other resources.

However, make sure that:

  • the task is assigned to user weblogic (or a group that weblogic is part of; or some other user with a configured email address)
  • the task is configured as actionable – and notifications are sent upon task assignment (the default setting)

The SOA Composite looks like this:

image

The task is assigned to user weblogic:

SNAGHTML8f0521

And it is actionable:

image

Additionally, notifications are sent for task assignment:

image


Deploy and Run

When the SOA composite is deployed and a test call is made, a new instance is created:

image

This instance is still running, waiting as it is for the task to be completed:

image

The task instance to act upon is visible to weblogic in the BPM Worklist application:

image

And if he fails to check over there, the Human Task has still reached out to him, via the actionable email:

image

The email does not contain a lot of useful details. It does have links for the two supported outcomes.

image

When we click the Approve link, the reply email is prepared:

image

it also allows weblogic to enter a comment. When we press Send, the mail is sent to the actionable email address that was configured for the Human Task engine.

image

When we check on the instance in the EM FMW Control – after we allow for the polling interval to pass:

image

The BPEL process audit trace provides insight in what happened in some more detail.

image

It is clear that mail was received and processed.

From the EM FMW Control’s overview page for the Human Workflow Engine that is opened using the SOA Infrastructure context menu Service Engines | Human Workflow

image

We can see an overview from all recent outbound and inbound email messages. Here we find the actionable email response that was received and we can inspect its contents:

image

Of course these emails can also be received on a mobile device – and the action can be taken on that device as well. While I as walking through our local DIY store, I received this mail on my iPhone:

image

After some time, I decided to act, by clicking the link to Approve:

image

I did not enter any comments or add any attachments. I merely pressed Send.

It turned out I had waited for too long and the task had already expired – or been handled by someone else; I received the following email from the Human Task service:

image

The post SOA Suite 12c: Actionable Emails with Human Task service appeared first on AMIS Technology Blog.

SOA Suite 12c: Human Task and Escalation through the LDAP hierarchy

$
0
0

A Human Task in SOA Suite can be configured to automatically escalate when the task is not taken care of for a certain period of time. This escalation implies that the task is assigned to the person (or persons) one level higher up the organizational hierarchy than the people who had gotten the task assigned originally.

In this article I will show very briefly a setup for the task definition and and the user & groups in the embedded LDAP directory in WebLogic that together make this escalation work.

The task is defined with the following Assignment for a one participant of type “single participant”  in a single stage:image

So the task is set (radio button) to be be auto-assigned to a single user according to the Least Busy assignment pattern. The Group to which the task is assigned is selected from the identity store (which is just the embedded LDAP directory in WebLogic).

On the Deadlines tab of the task editor, we have specified that the assignees better be quick: after two minutes, the task will be escalated to the next level up the hierarchical food chain:

image

If we had 40 levels of hierarchy, that is how for the task could get escalated. We run out of hierarchy after about three levels – because that is the way how things are defined in the LDAP.

Through the WebLogic Admin console, I created several users (Dick, Tom, Harry, Matthew and Mark), groups (Account Manager, Sales Manager and CEO) and group memberships (Tom, Dick and Harry => Account Manager, Matthew to => Sales Manager and Mark => CEO). Using the JXplorer tool and the perfect instructions in this article: Creating an hierarchical user structure in embedded LDAP of weblogic , I ensured that Tom, Dick and Harry are peers that report to Matthew who reports to Mark:

image

The exact value for the manager attribute is:

uid=Matthew,ou=people,ou=myrealm,dc=soa_domain

in the case of Tom, Dick and Harry.

Deploy and Run

If the SOA composite that contains the task is deployed and its exposed service is invoked. the task gets instantiated – assigned to the role of Account Manager. If we do not touch it, it will be escalated: after two minutes to the manager(s) of the Account Managers and two minutes later to the manager of that/those manager(s) – Mark, the CEO. This is what the flow trace tells us after five minutes:

image


Right after calling the service, you could login to the BPM worklist application, as Tom. You should see the newly created task – available for Tom to work on. Logout and login as Dick. This user too should see the task, because of his membership of the Account Manager group to which the task was assigned. The same applies to Harry.

If Dick claims the task or even executes it, it is no longer available to Tom and Harry: only one of them has to complete the task. After initially claiming the task, Dick can also release the task if for some reason he cannot complete it after all. The task the reappears in the todo lists for all three account managers.

If no one touches the task for 2 minutes, an automatic escalation takes place. Login to the BPM worklist application as Matthew before the 2 minutes are up, and there should not be any tasks visible. However, when an AssessProposal task was unattended for 2 minutes, the manager of the original assignees – Matthew, who is the manager of Tom, Dick and Harry – gets the now escalated task assigned. And if he does not react within 2 minutes, the task is moved up the hierarchy once more, to Mark whom Matthew reports to.

Note: It seems that the setting of the radio button to be auto-assigned to a single user [according to the Least Busy assignment pattern]is crucial (without I did not get the escalation). I have not tried but suppose the users with the initial role (Account Manager) would have several managers among themselves, would then escalation take place to all of these managers? And would the next round of escalation involve multiple people as well – the managers of these first time managers?

Note: this article complements chapter 17 of the Oracle SOA Suite 12c Handbook.

The post SOA Suite 12c: Human Task and Escalation through the LDAP hierarchy appeared first on AMIS Technology Blog.

Viewing all 102 articles
Browse latest View live